How I Catalog My Closet and Track What I Wear with the Stylebook Closet App

STYLEBOOK CLOSET APP REVIEW
It’s no secret that I’m a huge fan of the Stylebook app (currently only available on the iOS platform). My entire closet is contained in an app right on my phone, which makes picking out my outfit from my bed every day super convenient. I also know exactly what’s in my closet, and I can easily reference it when I’m out and about shopping (ah, those were the days). It’s an excellent tool when it comes to making purchasing decisions because you can quickly and easily see what you already own. It’s by far my most-used app on my phone; I track what I wear every day, and I also use it to streamline my packing lists for trips, track cost per wear and other stats, and figure out what items I should pass on to their next home.
I’ve been using Stylebook since summer of 2014, and I started blogging in the fall of 2013, so I’ve been tracking my outfits almost as long as I’ve been blogging! Even though there are many updates I would make to the app if I could (the developer rarely makes updates; I can recall only one update in the nearly six years I’ve had the app), it’s still worth the $4 one-time cost to me. That comes down to less than $1 per year! 😉
If you’ve been interested in the Stylebook app yourself, this post is a deep dive into exactly how I use it as well as some tips and tricks! Here’s what I’m covering:
An overview of the main app features
How I catalog my closet and tips for inputting your items
Creating looks from your items and logging them on the calendar
Using packing lists for trips and style challenges
The variety of style stats
How I “remove” items that were sold or donated
Quick comparison to the similar (but different!) Cladwell app
An Overview of Stylebook App

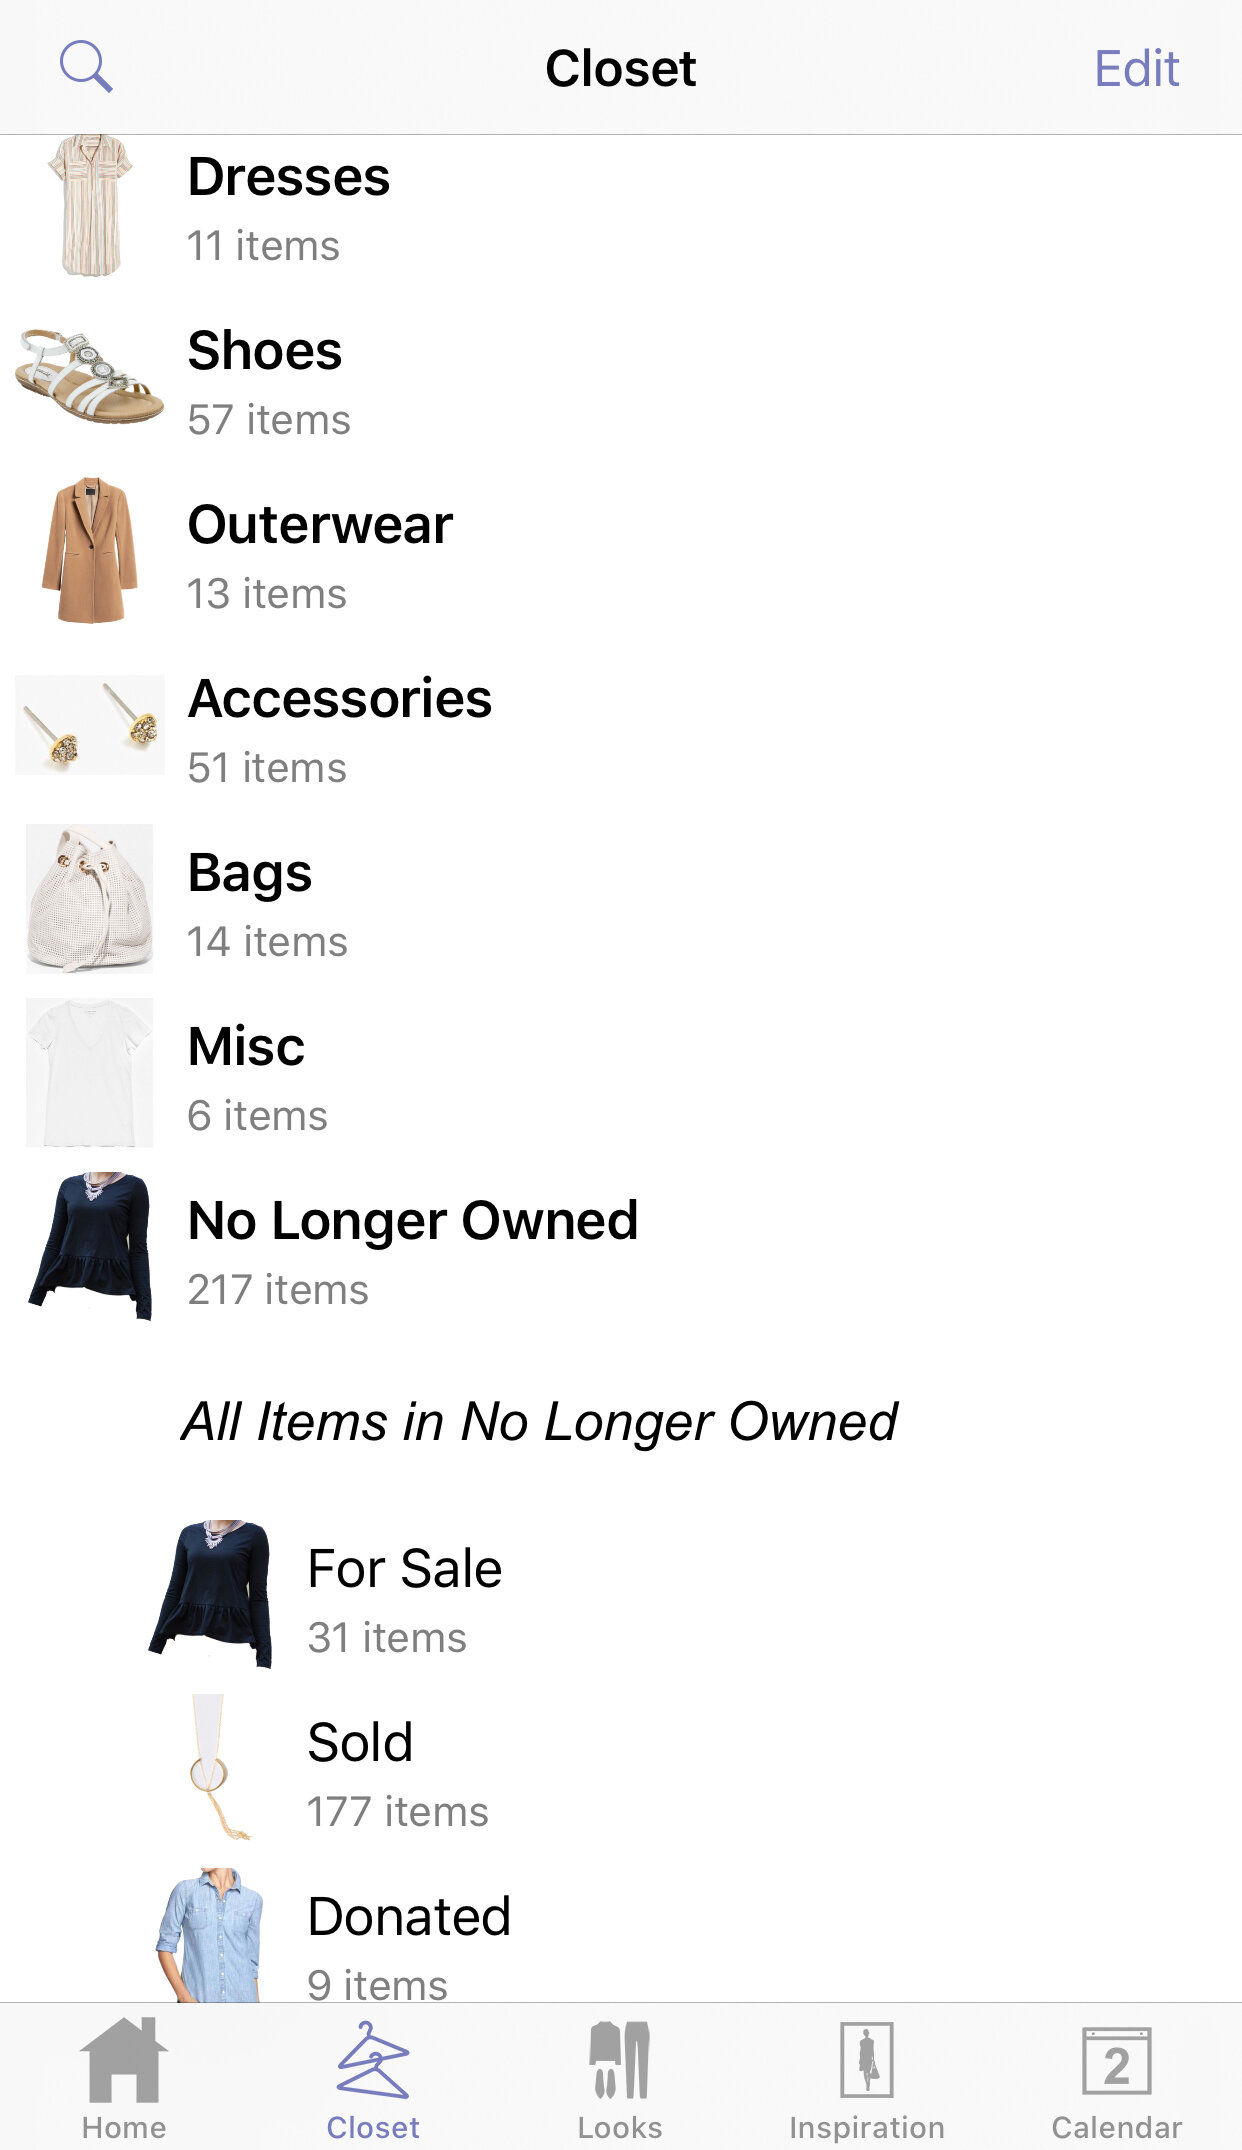
CLOSET — All of the items in your closet grouped into the categories of your choosing
LOOKS — Your outfits, which are made up of items from your closet and can also be grouped into categories that you create yourself
INSPIRATION — Save photos that inspire you and your style from blogs, Pinterest, Instagram, etc. I’ve also seen people share photos of outfits they wear themselves. I do not use this feature personally.
CALENDAR — Add what you wear (or plan to wear) to each calendar day
PACKING — Create packing lists with your items (plus text lists) and include looks you wore or plan to wear
STYLE STATS — Track what you wear the most and least, what items have the best and worst costs per wear, which items haven’t been worn, which items are packed the most, what colors you own, what brands you own, etc.
SHOP — Visit popular retailers and clip photos from their websites directly (I have not used this feature.)
STYLE EXPERT — External information and references from the app developer (I have not looked at any of it.)
WIFI ACCEPT — I also have never used this, but it appears to be some sort of AirDrop-like feature that receives items/photos from other devices.
How to Catalog Your Closet with Stylebook
To start using the app, you first need to input photos of every item in your closet. This is the most time-consuming part, but I promise it’s worth it in the end! Here are my tips for streamlining the process:
Instead of trying to get everything in your app at once, input items as you wear them.
Grab stock photos for as many items as possible. This part is easy for me as a blogger because I grab stock photos for my budget posts. (I try to grab them as soon as I purchase an item just in case it sells out or disappears before my budget post goes live.)
Stylebook has an internal feature called “Import from Web” that grabs the stock photo if you give it a link. I don’t use this; I save photos/take screenshots on my computer (for blog purposes) and then AirDrop them to my phone to add them to my Stylebook.
If you can’t find an exact match, grab a stock photo of something that is super similar. If it’s a very unique item or if you don’t like any stock photos you find (maybe the stock photo is too pixelated), photograph the item yourself. Do NOT use the app to take the photo; use your built-in phone camera, crop the photo, edit the lighting/colors if necessary, and then import the photo to Stylebook. I’ve only photographed a handful of my items myself.
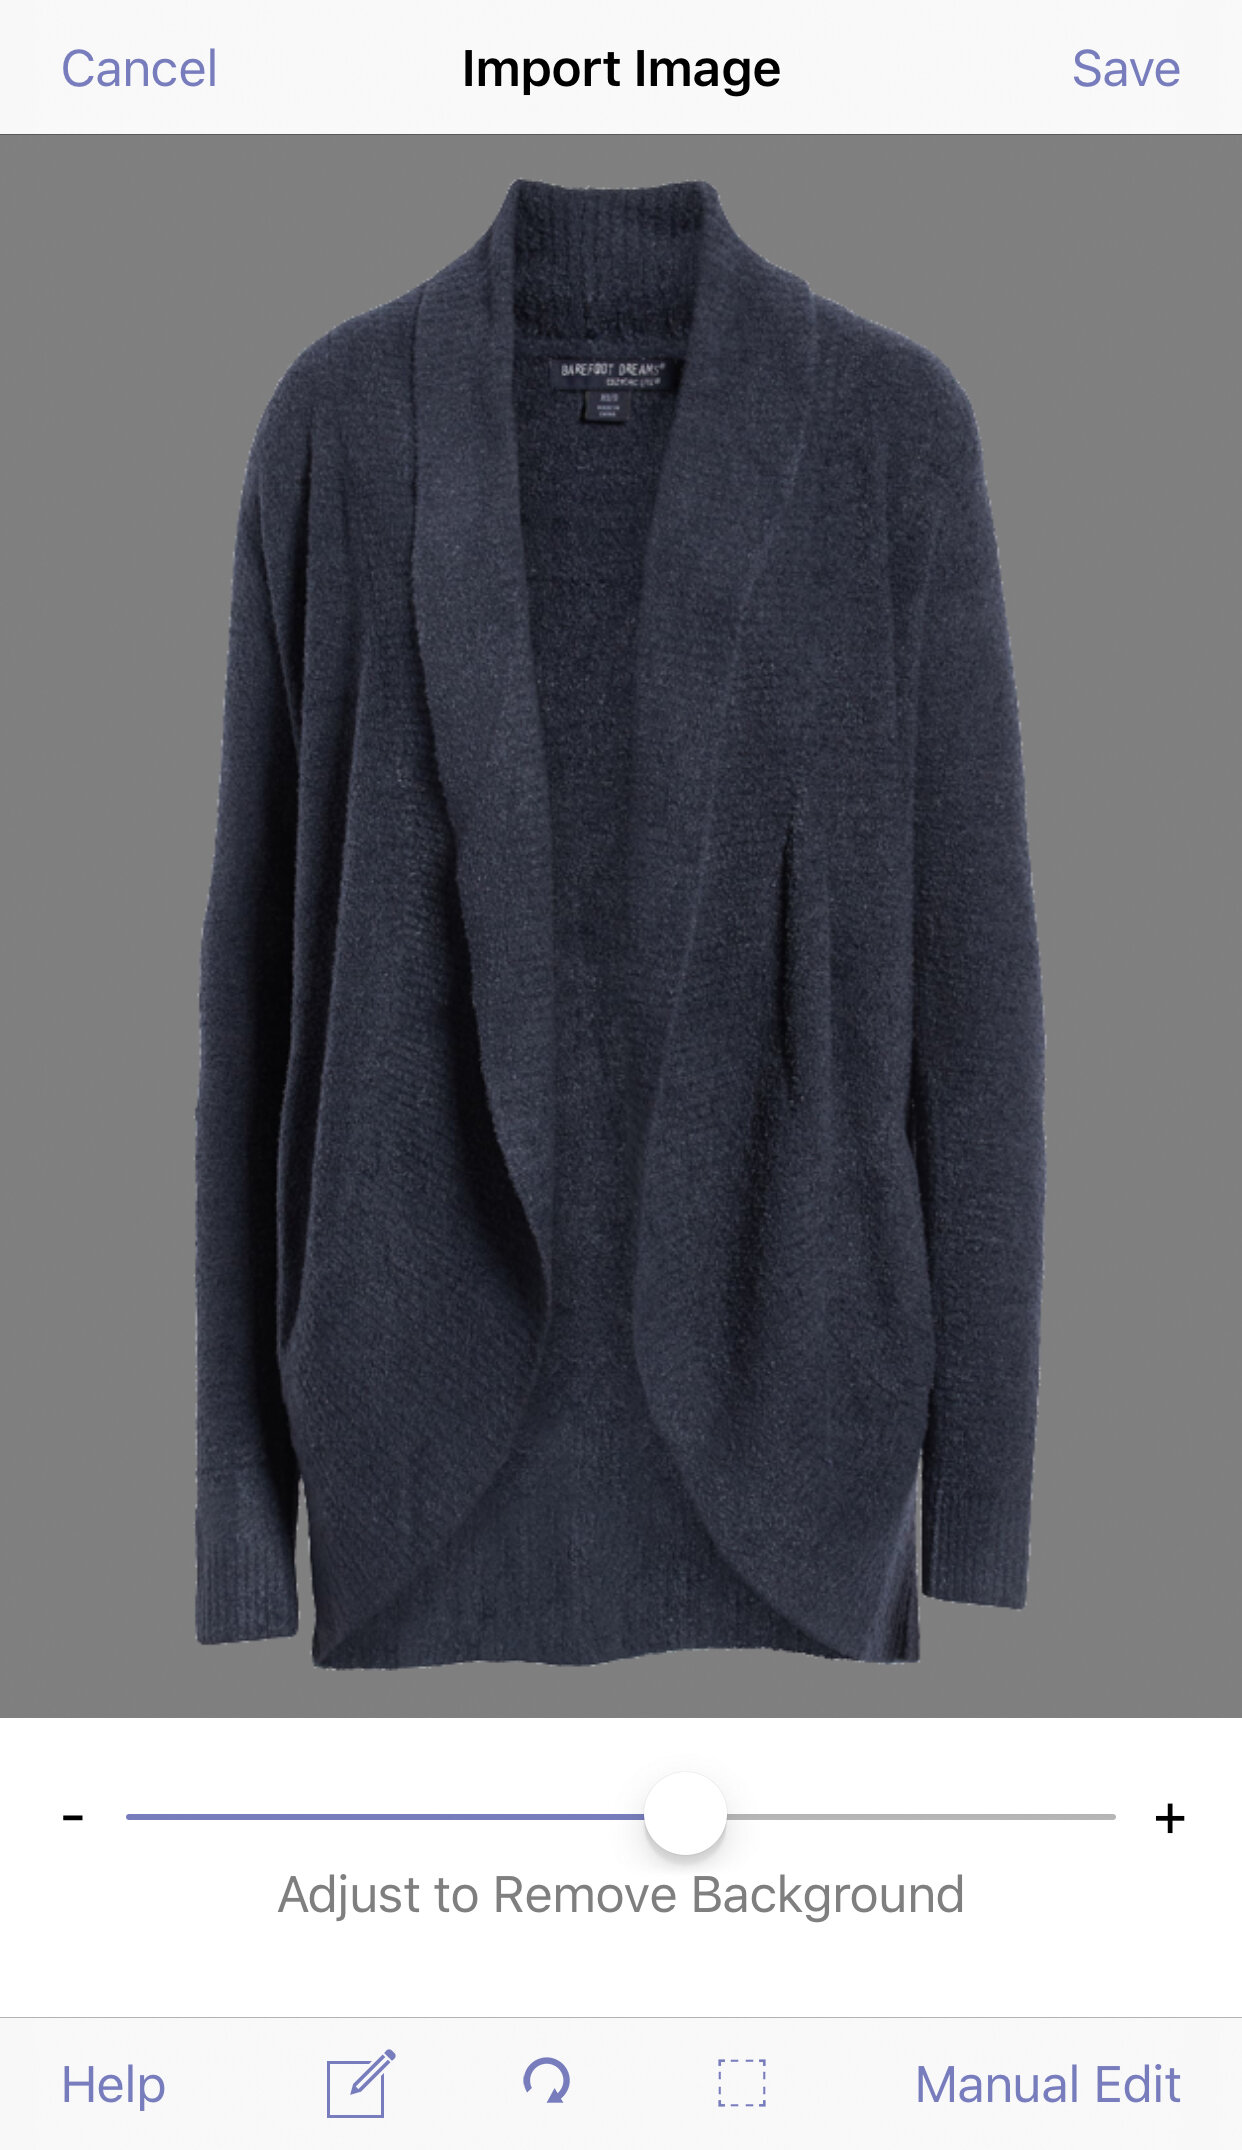
Once an item is imported, the app should automatically remove most of the background, which is super helpful. You can manually remove the background if the app is unable to do a good job on its own. I use a combination of the tap and erase tools to remove stubborn backgrounds. Light-colored items on light-colored backgrounds are the worst for these, so avoid that if possible (or live with the background on those items; I have a number of items with the background still showing because I’m lazy).
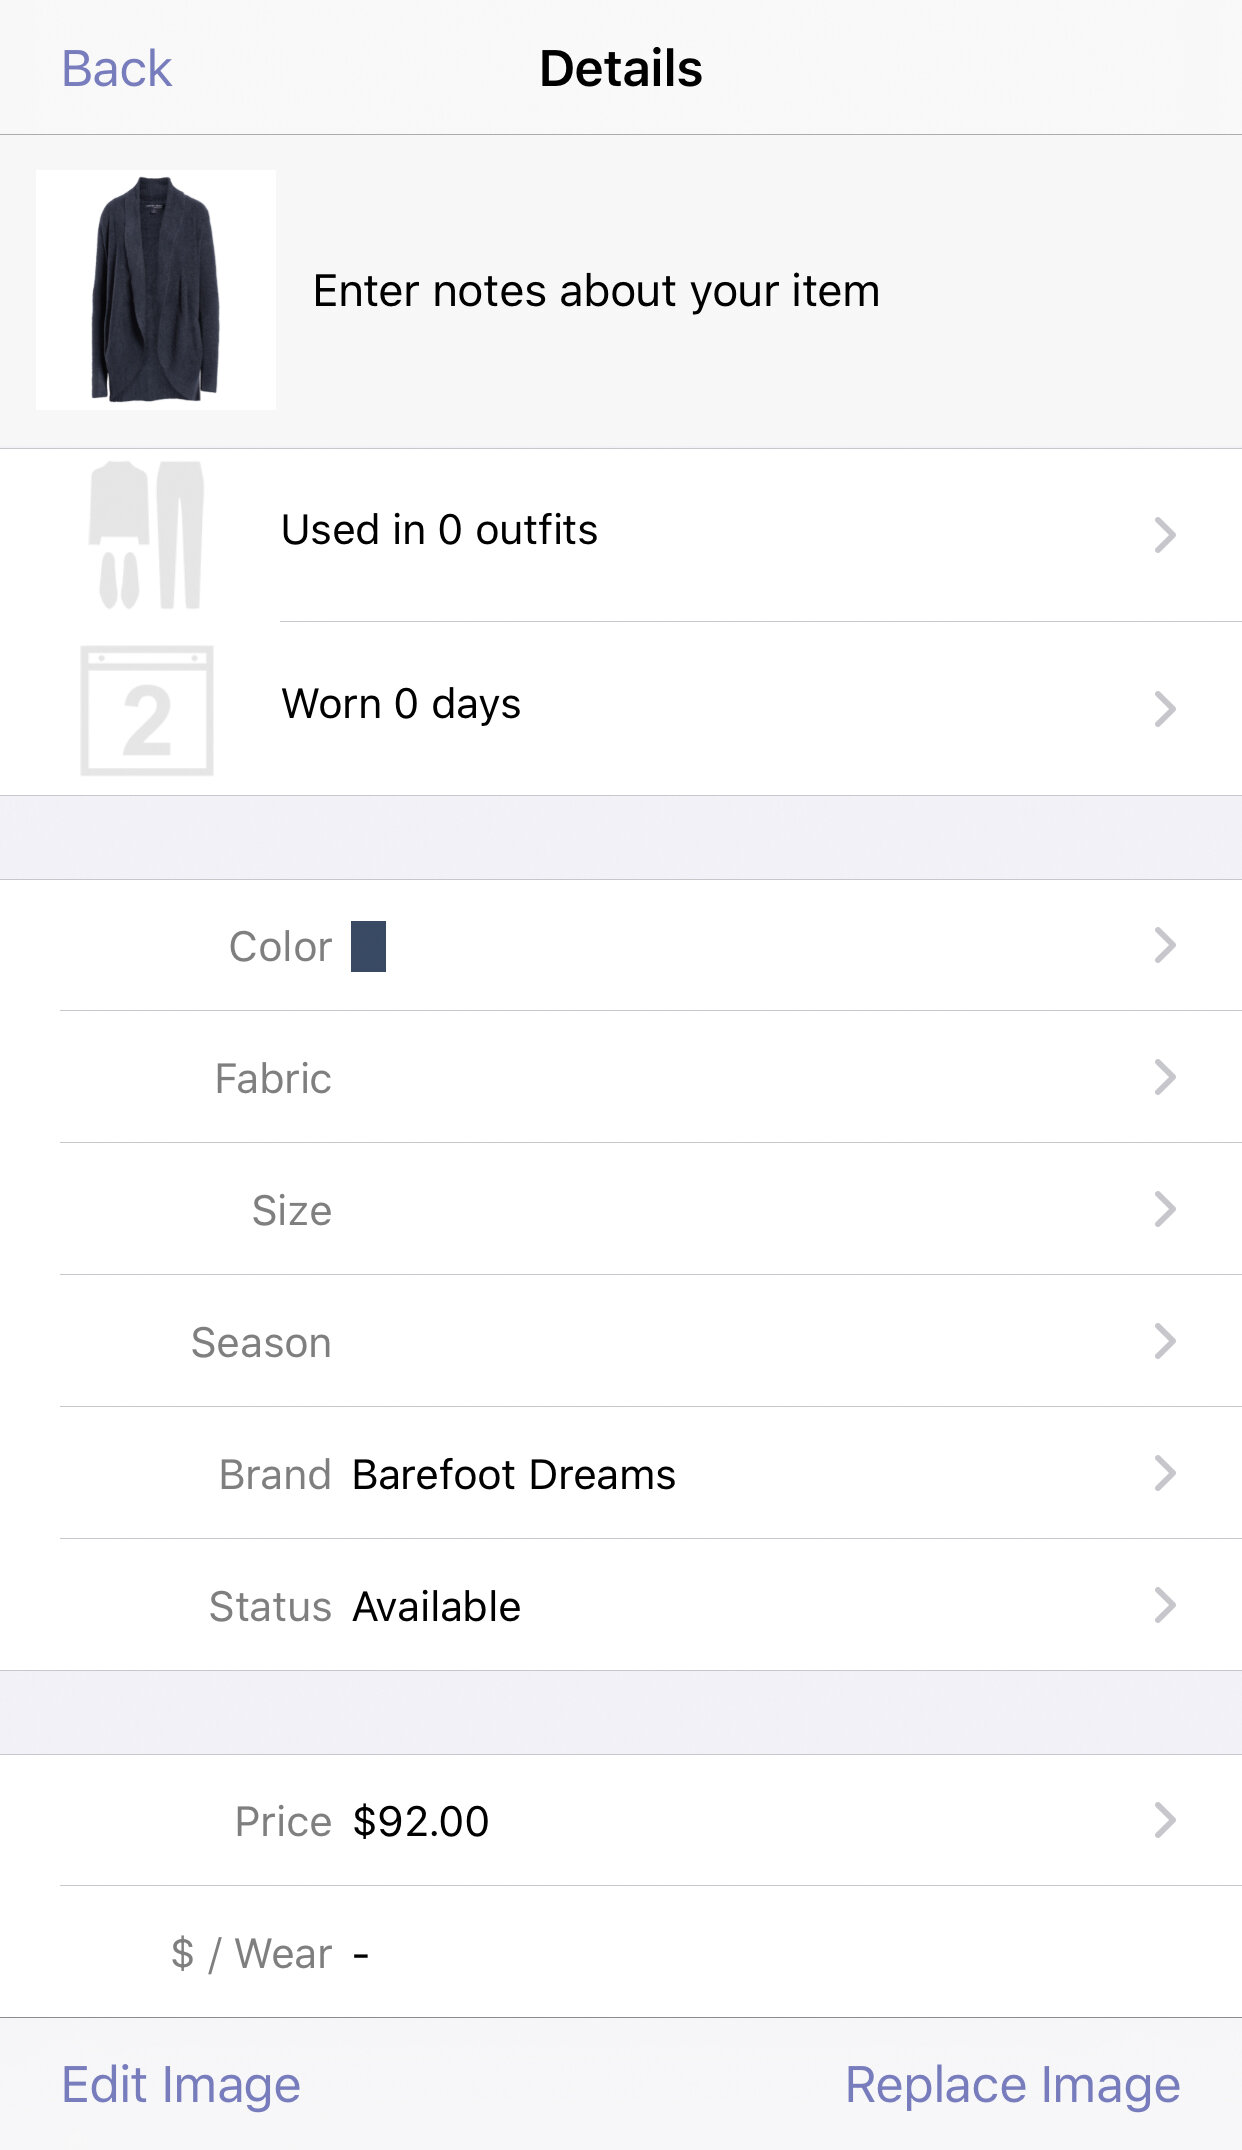
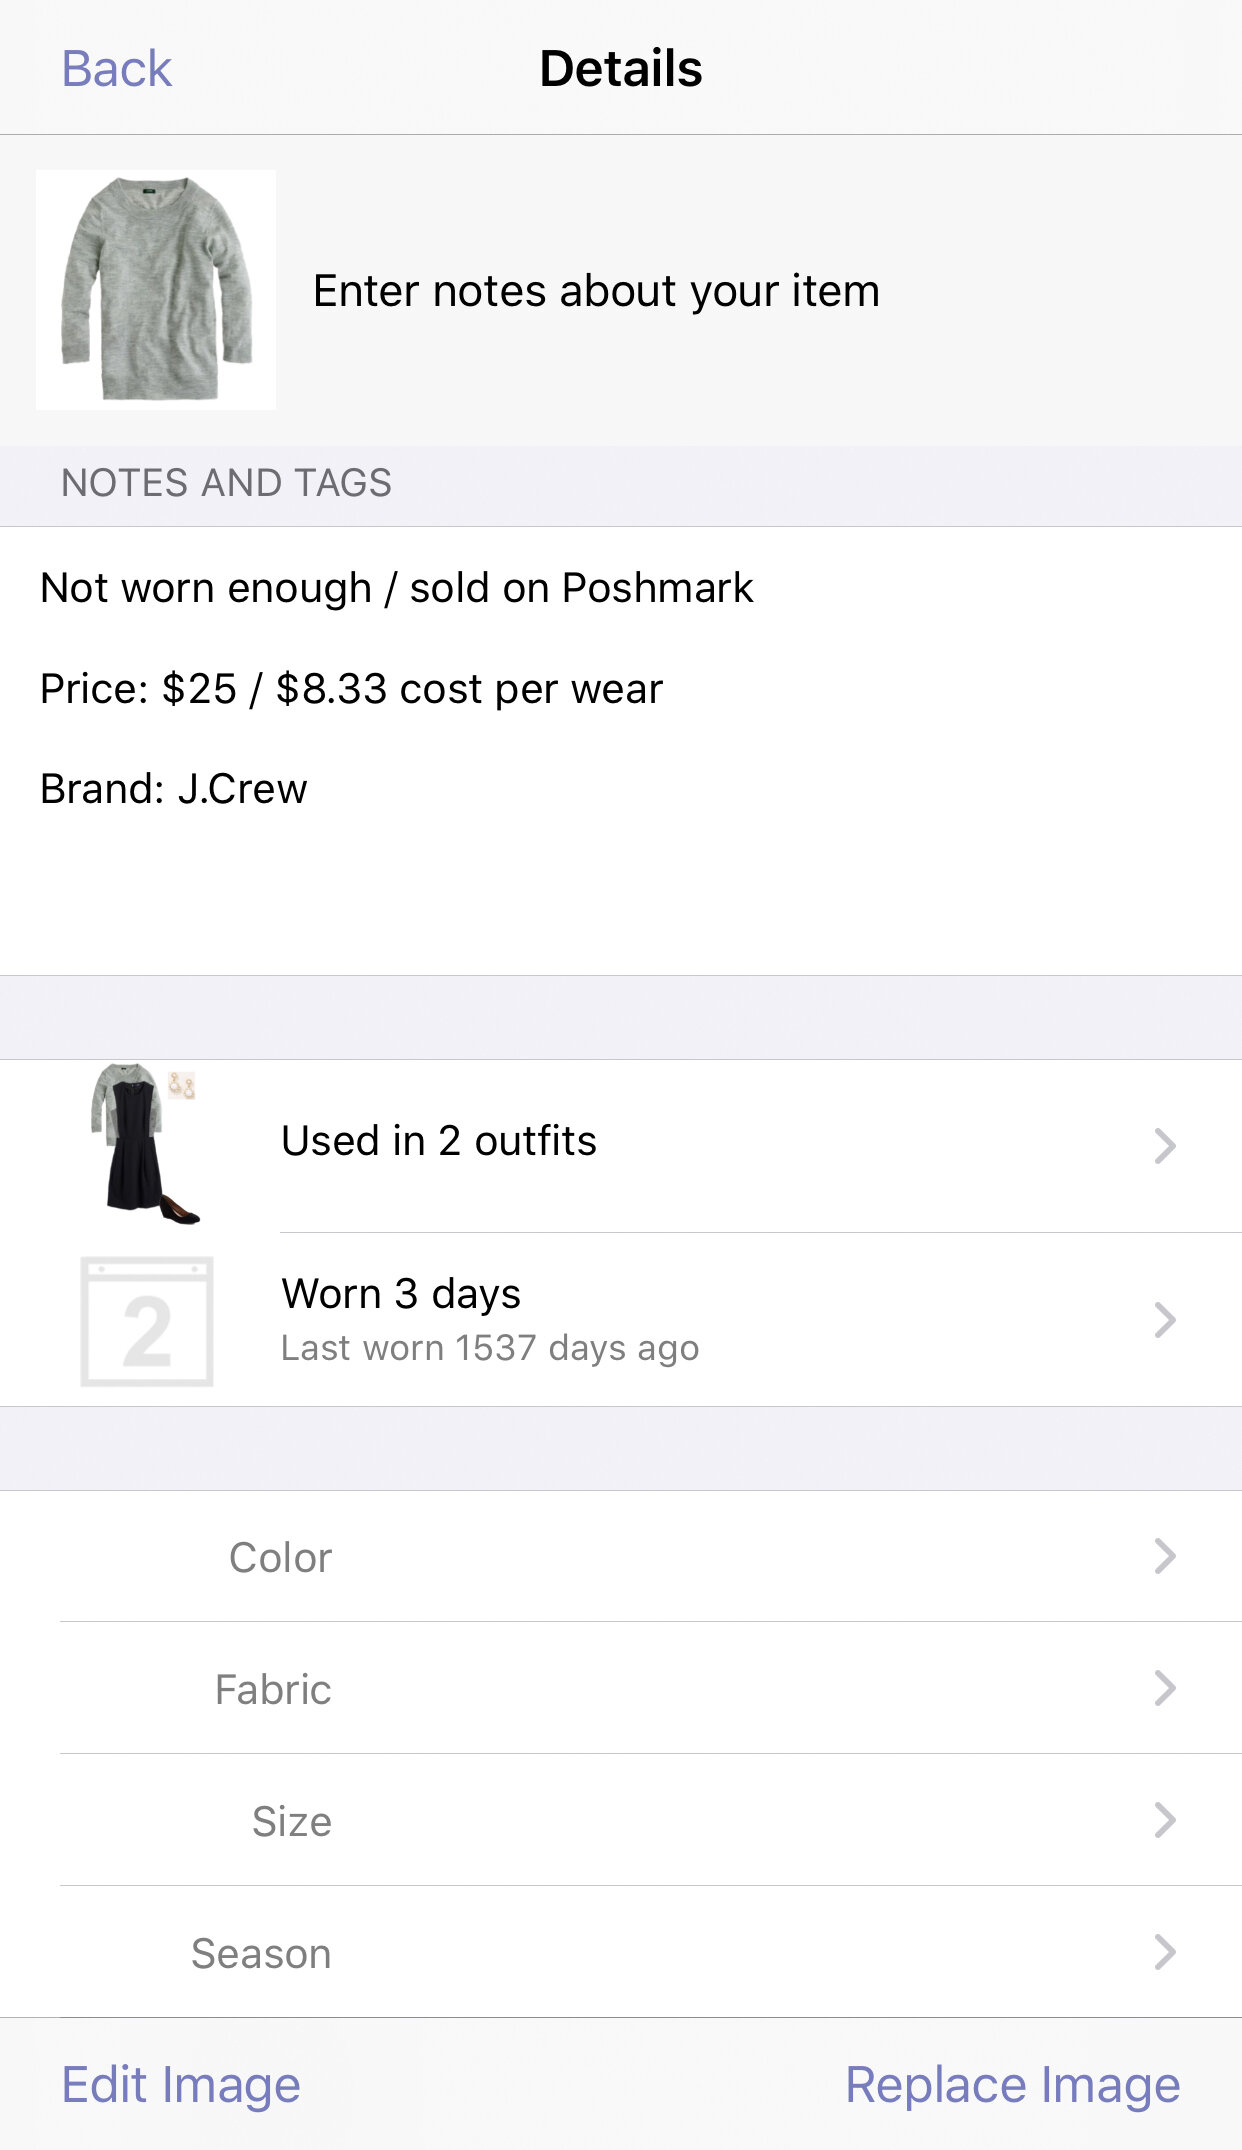
When viewing your item, the icon on the bottom left corner is where you can add the details, including the color(s), fabric, size, season, brand, status, and price. I put information in the color, brand, and price sections. You can select as many colors as you want, but I typically stick to three at the most. There is also a section for notes; I use this section to write when I use a gift card to purchase an item in the notes section and leave the price as the price I would have paid without the gift card. I also note denim wash if applicable as so many look alike!
Group your items by category. You can edit the existing categories and add new categories based on what you own! I’ve seen people create capsule wardrobe categories to keep their capsule items organized and all in one place.
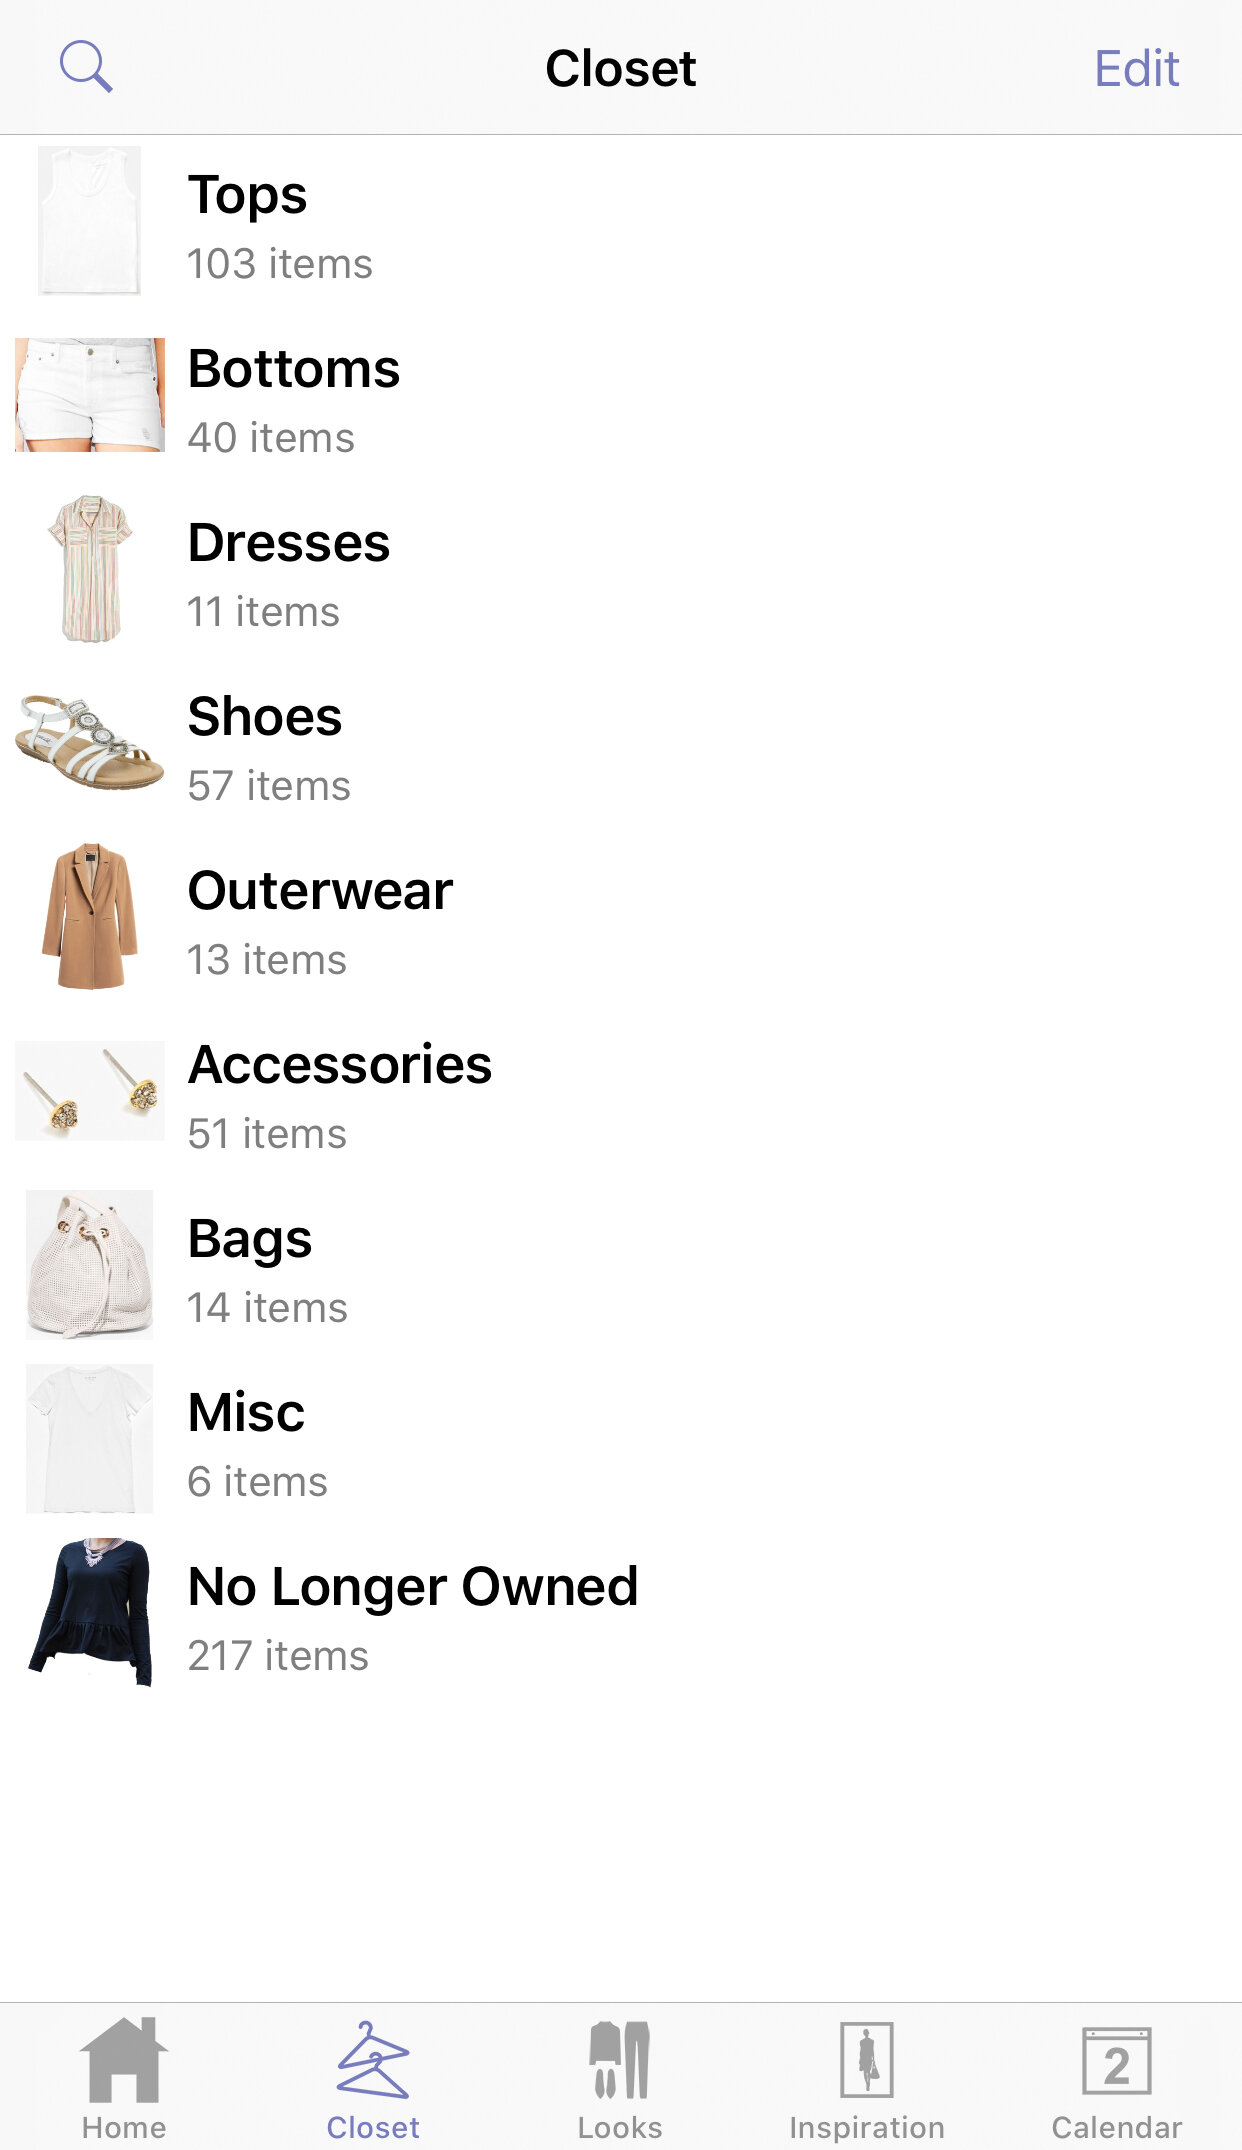
All of my day-to-day, “out in the world” clothing, shoes, and accessories are included in my app. This may vary for you depending on the activities you do! The things I do not include are:
Pajamas
Workout gear (though I now include bike shorts and leggings)
Swimwear/coverups
Concert/band shirts and other fan merch
Athletic team wear
Specialized items (ski gear, etc.)
I used to not include loungewear and activewear but have since started including it due to the pandemic. This list could look totally different for you. If you spend a lot of time outdoors or working out, include those items and make special categories for them. Basically, include any items and categories you want to track!
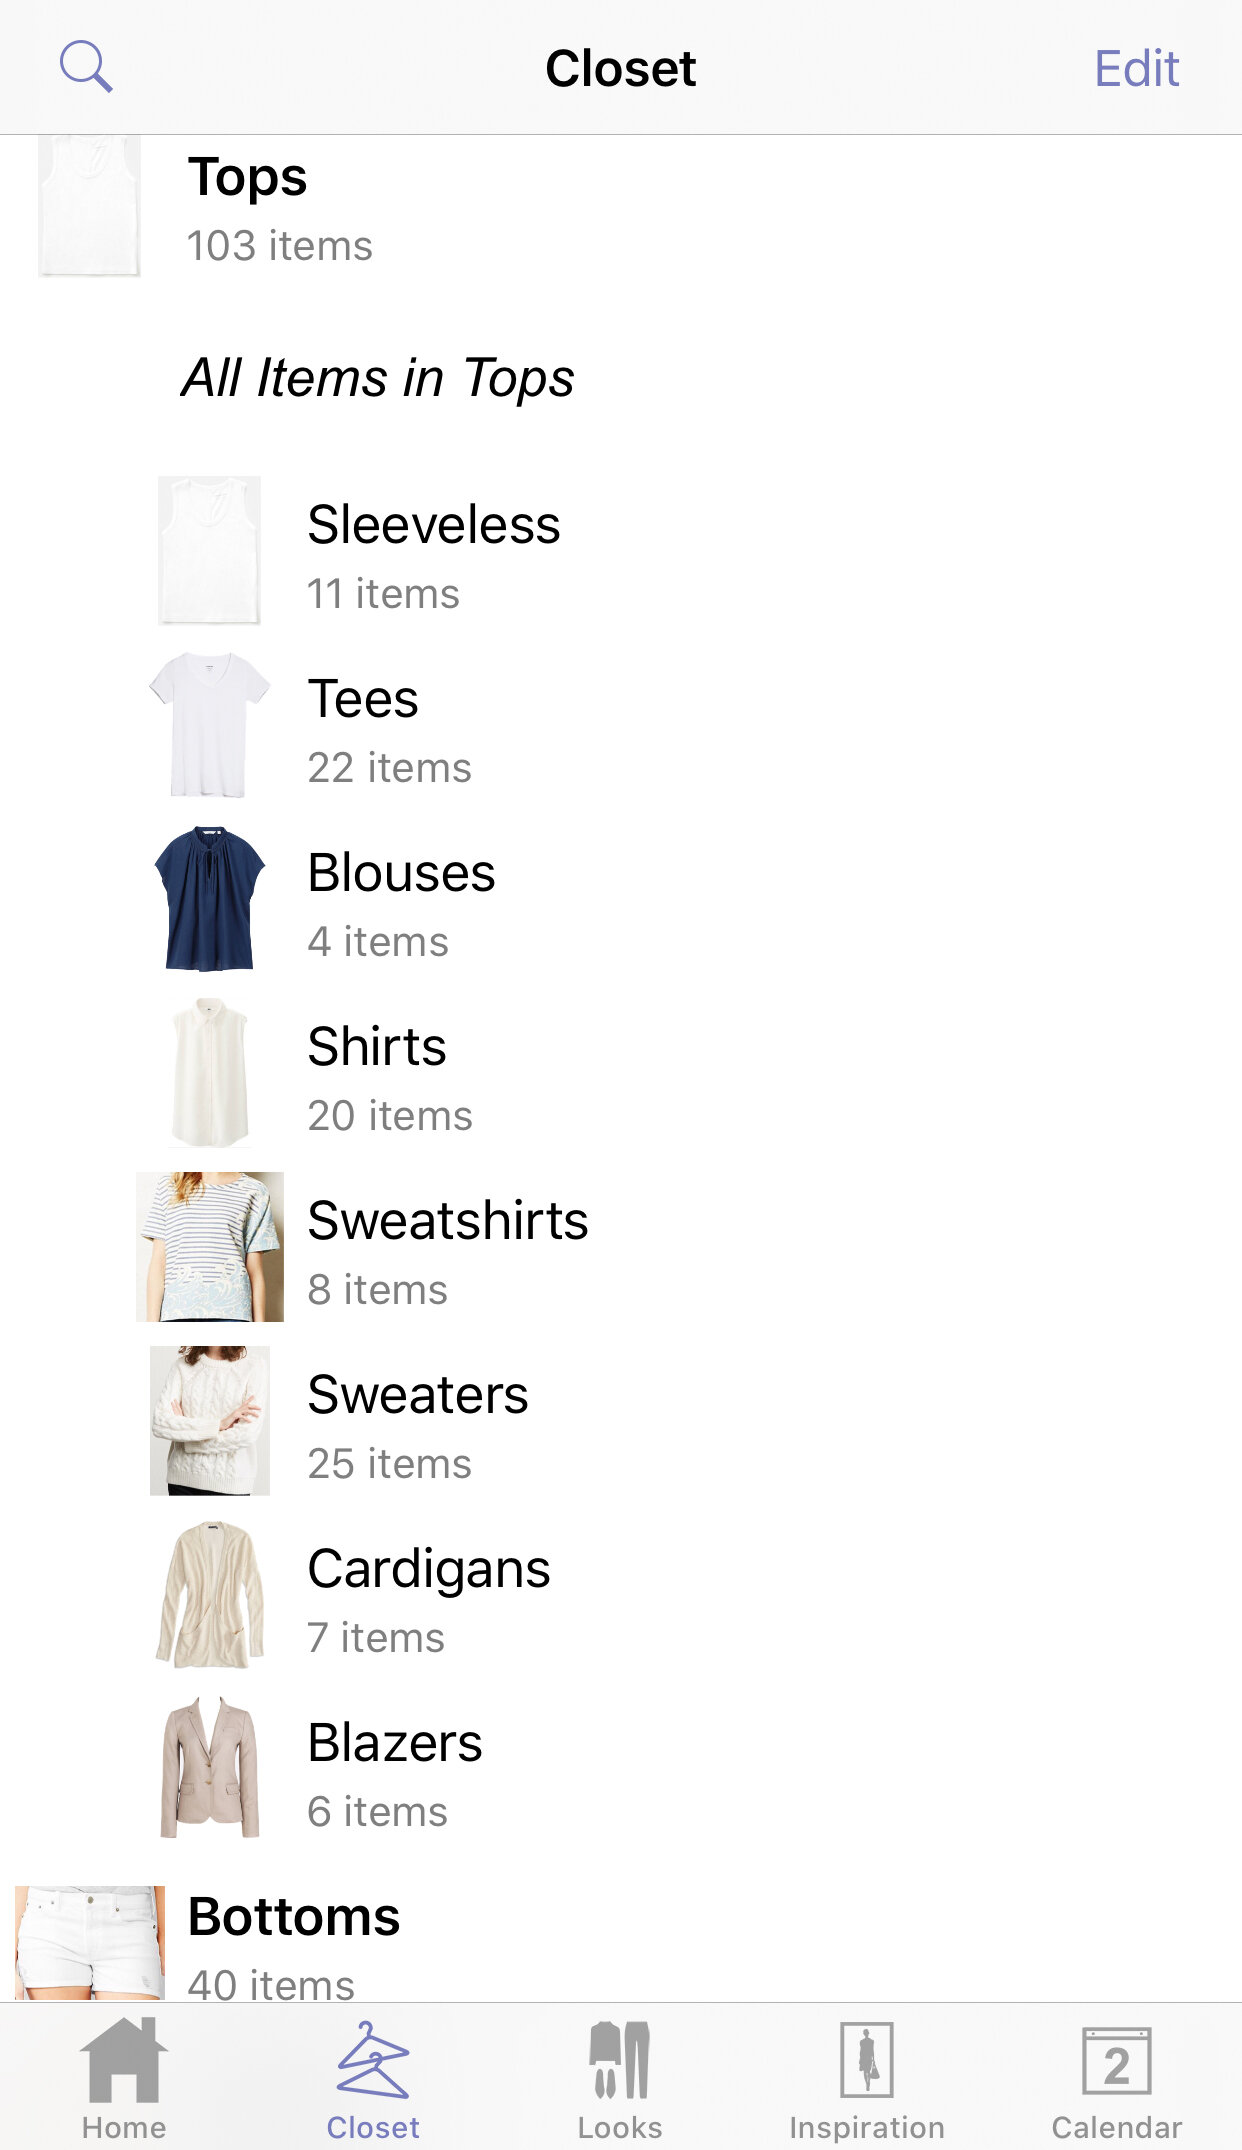
TIP: You can further organize the items within each subcategory! I organized each subcategory in my closet by color in rainbow order. Tap “Select” in the bottom right corner, then click and drag the item you want to move to its new location. Tap “Done” when you’re done to save it.
How to Create Looks in Stylebook and Add to Calendar
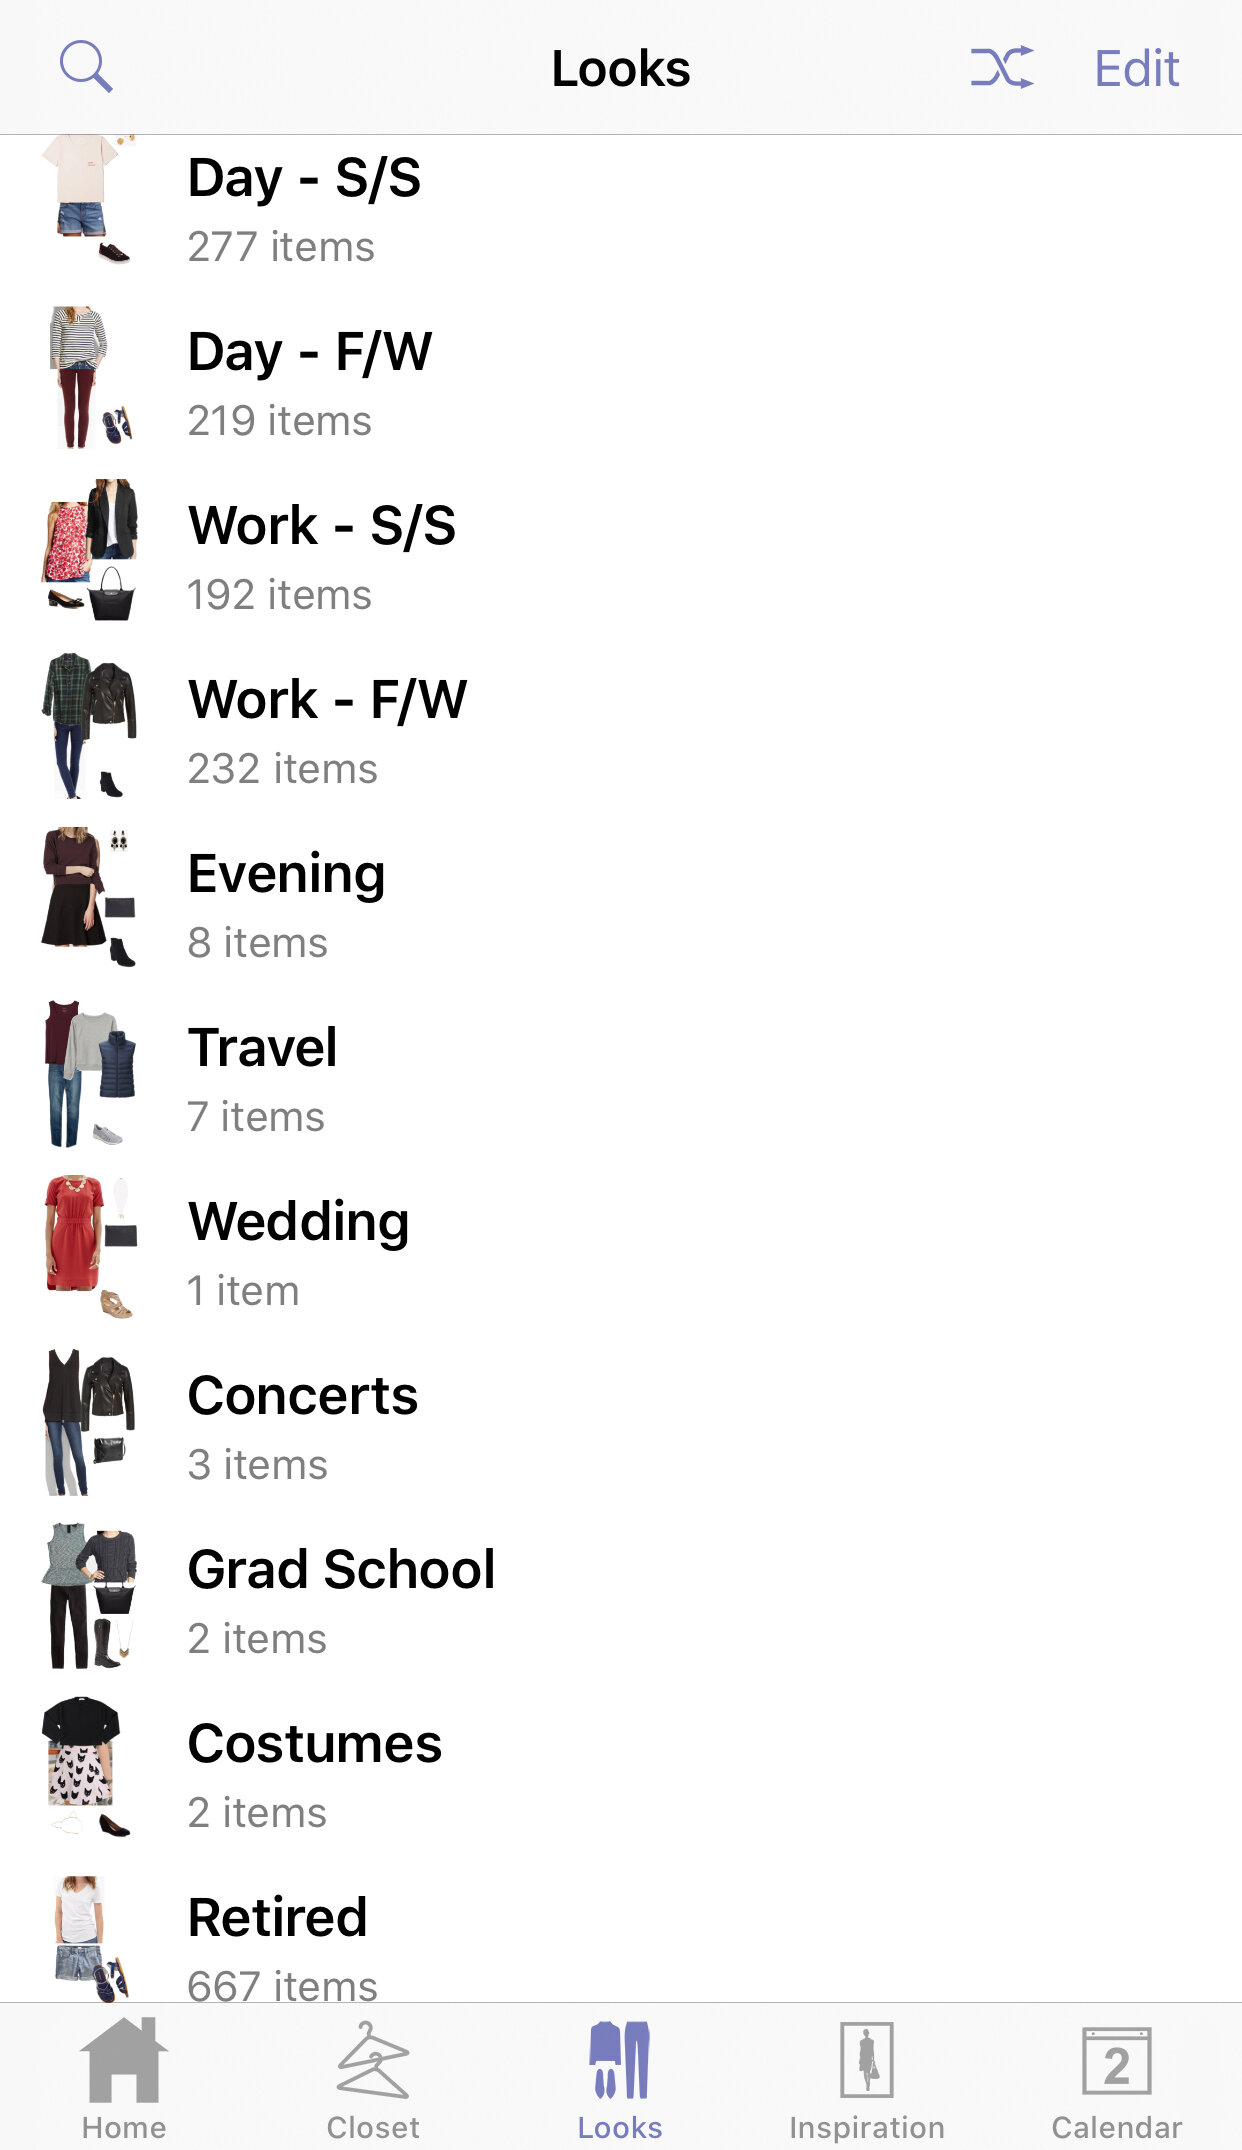
Once you have your items in your closet, you can start making looks! As far as I know, you can add as many items to a look as you want. You can also add a photo from your inspiration section to a look. Like with your clothing items, you can make whatever categories you want for your looks. Mine are broken up into everyday spring/summer looks, everyday fall/winter looks, spring/summer workwear, fall/winter workwear, evening looks, travel looks, wedding, etc. I also have a section called “Retired” for the outfits that include at least one item that I no longer own (more on that below).
When you create looks, the items in the looks can be resized by tapping the item you want to resize and pinching it in or pulling it out, and you can select “manually resize” to resize the items that are difficult to resize by hand (some jewelry pieces are small and hard to pinch into place).

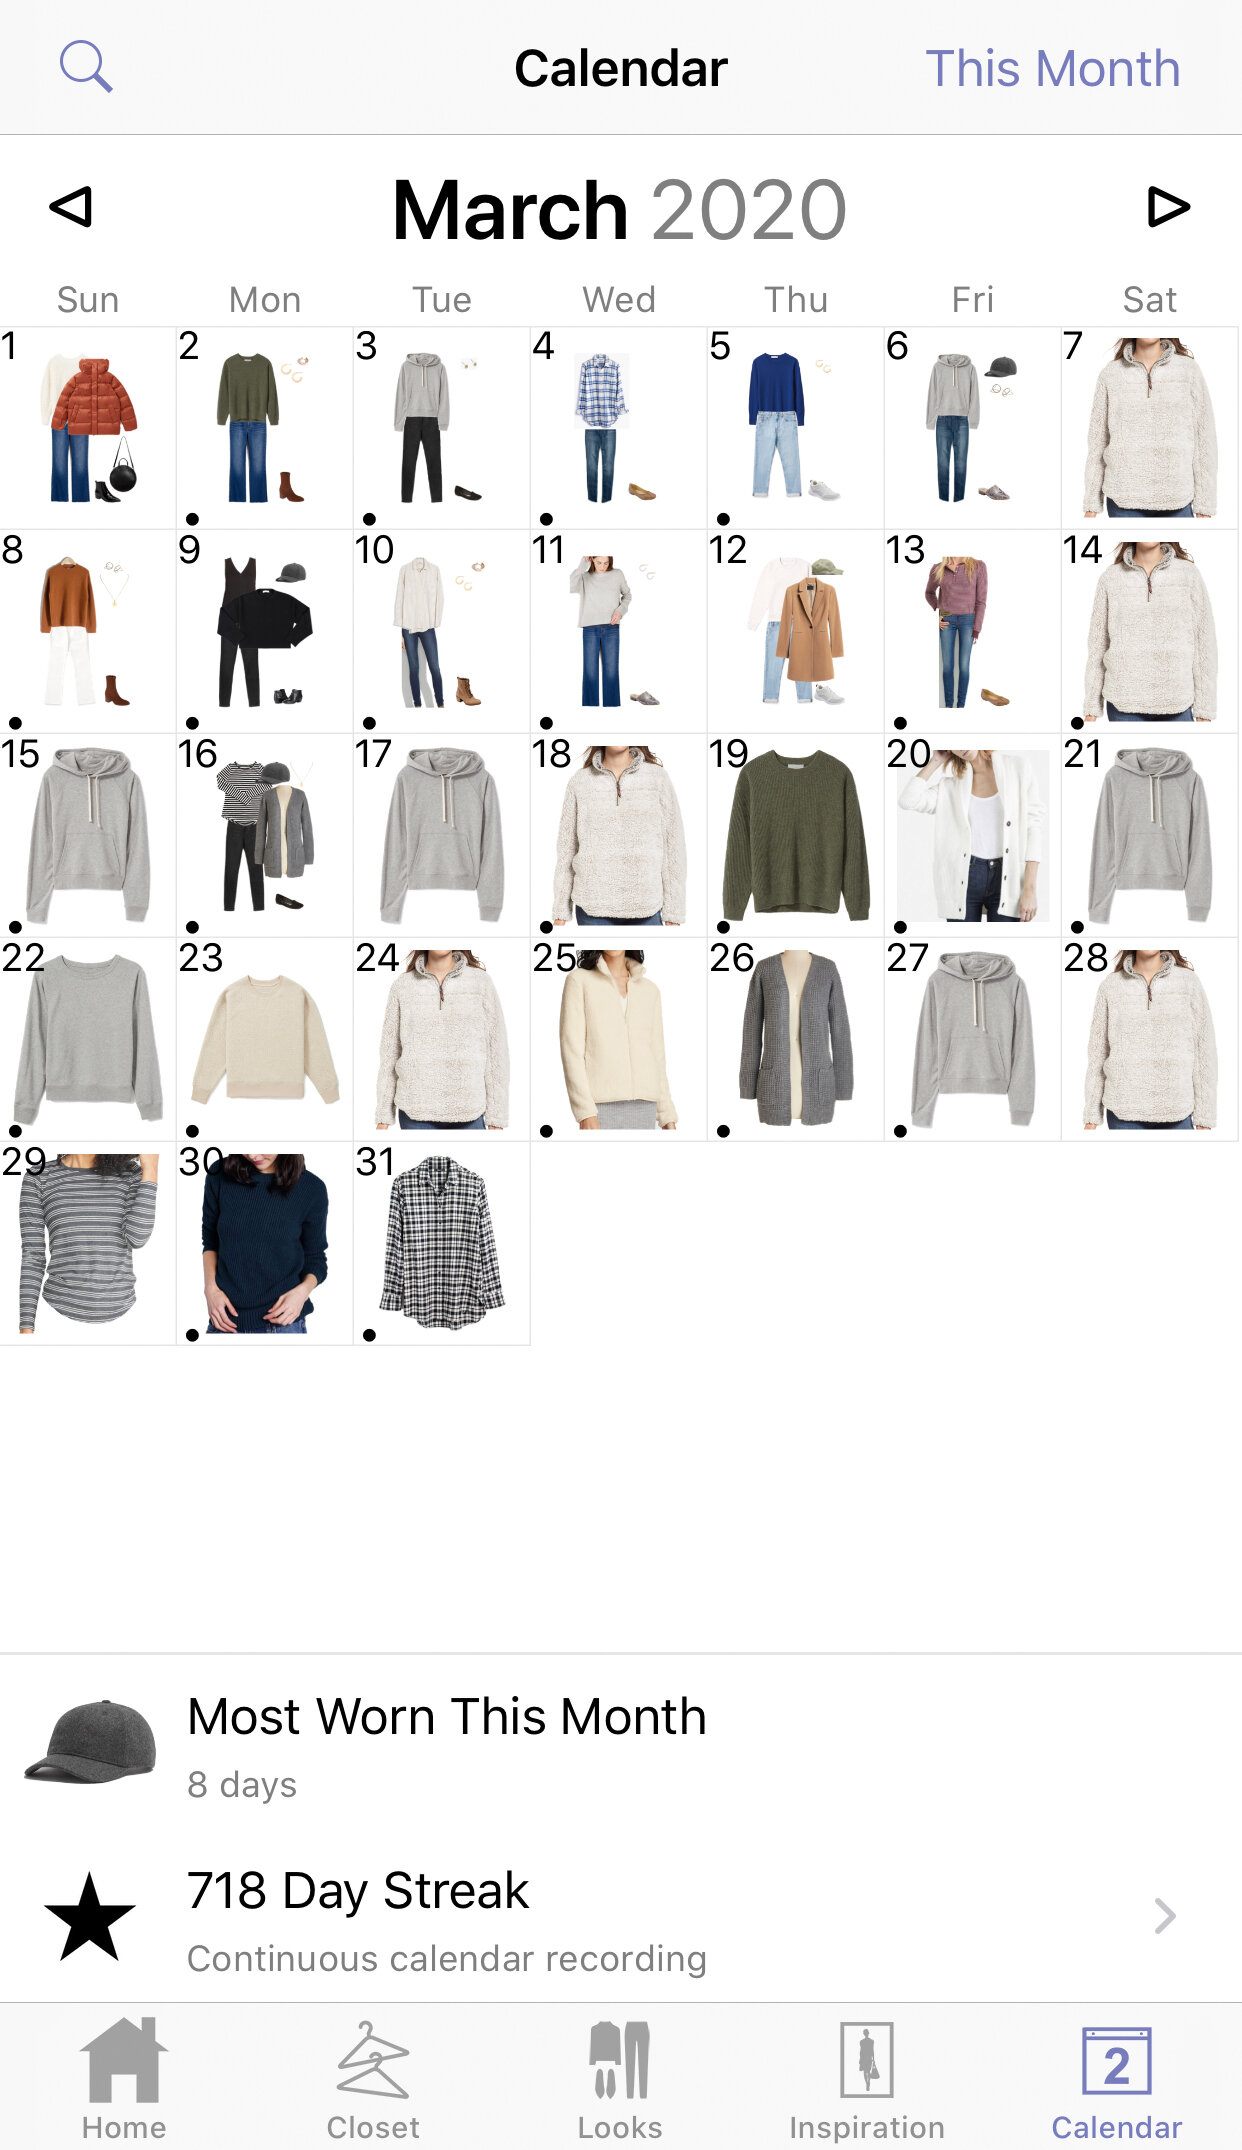
I create a new look almost every day. If I wear almost exactly the same outfit as a previous look but change one thing (maybe swap earrings or shoes), I’ll make a new outfit. I’m up to over 2,000 outfits in my app, which is crazy! I’ve stopped making looks since I started working from home (I bet you can guess what day that started by looking at the photo above, haha). I will be adding my loungewear pieces that have become work from home staples so I can start logging my work from home outfits, and I’ll also make a new category for those outfits.
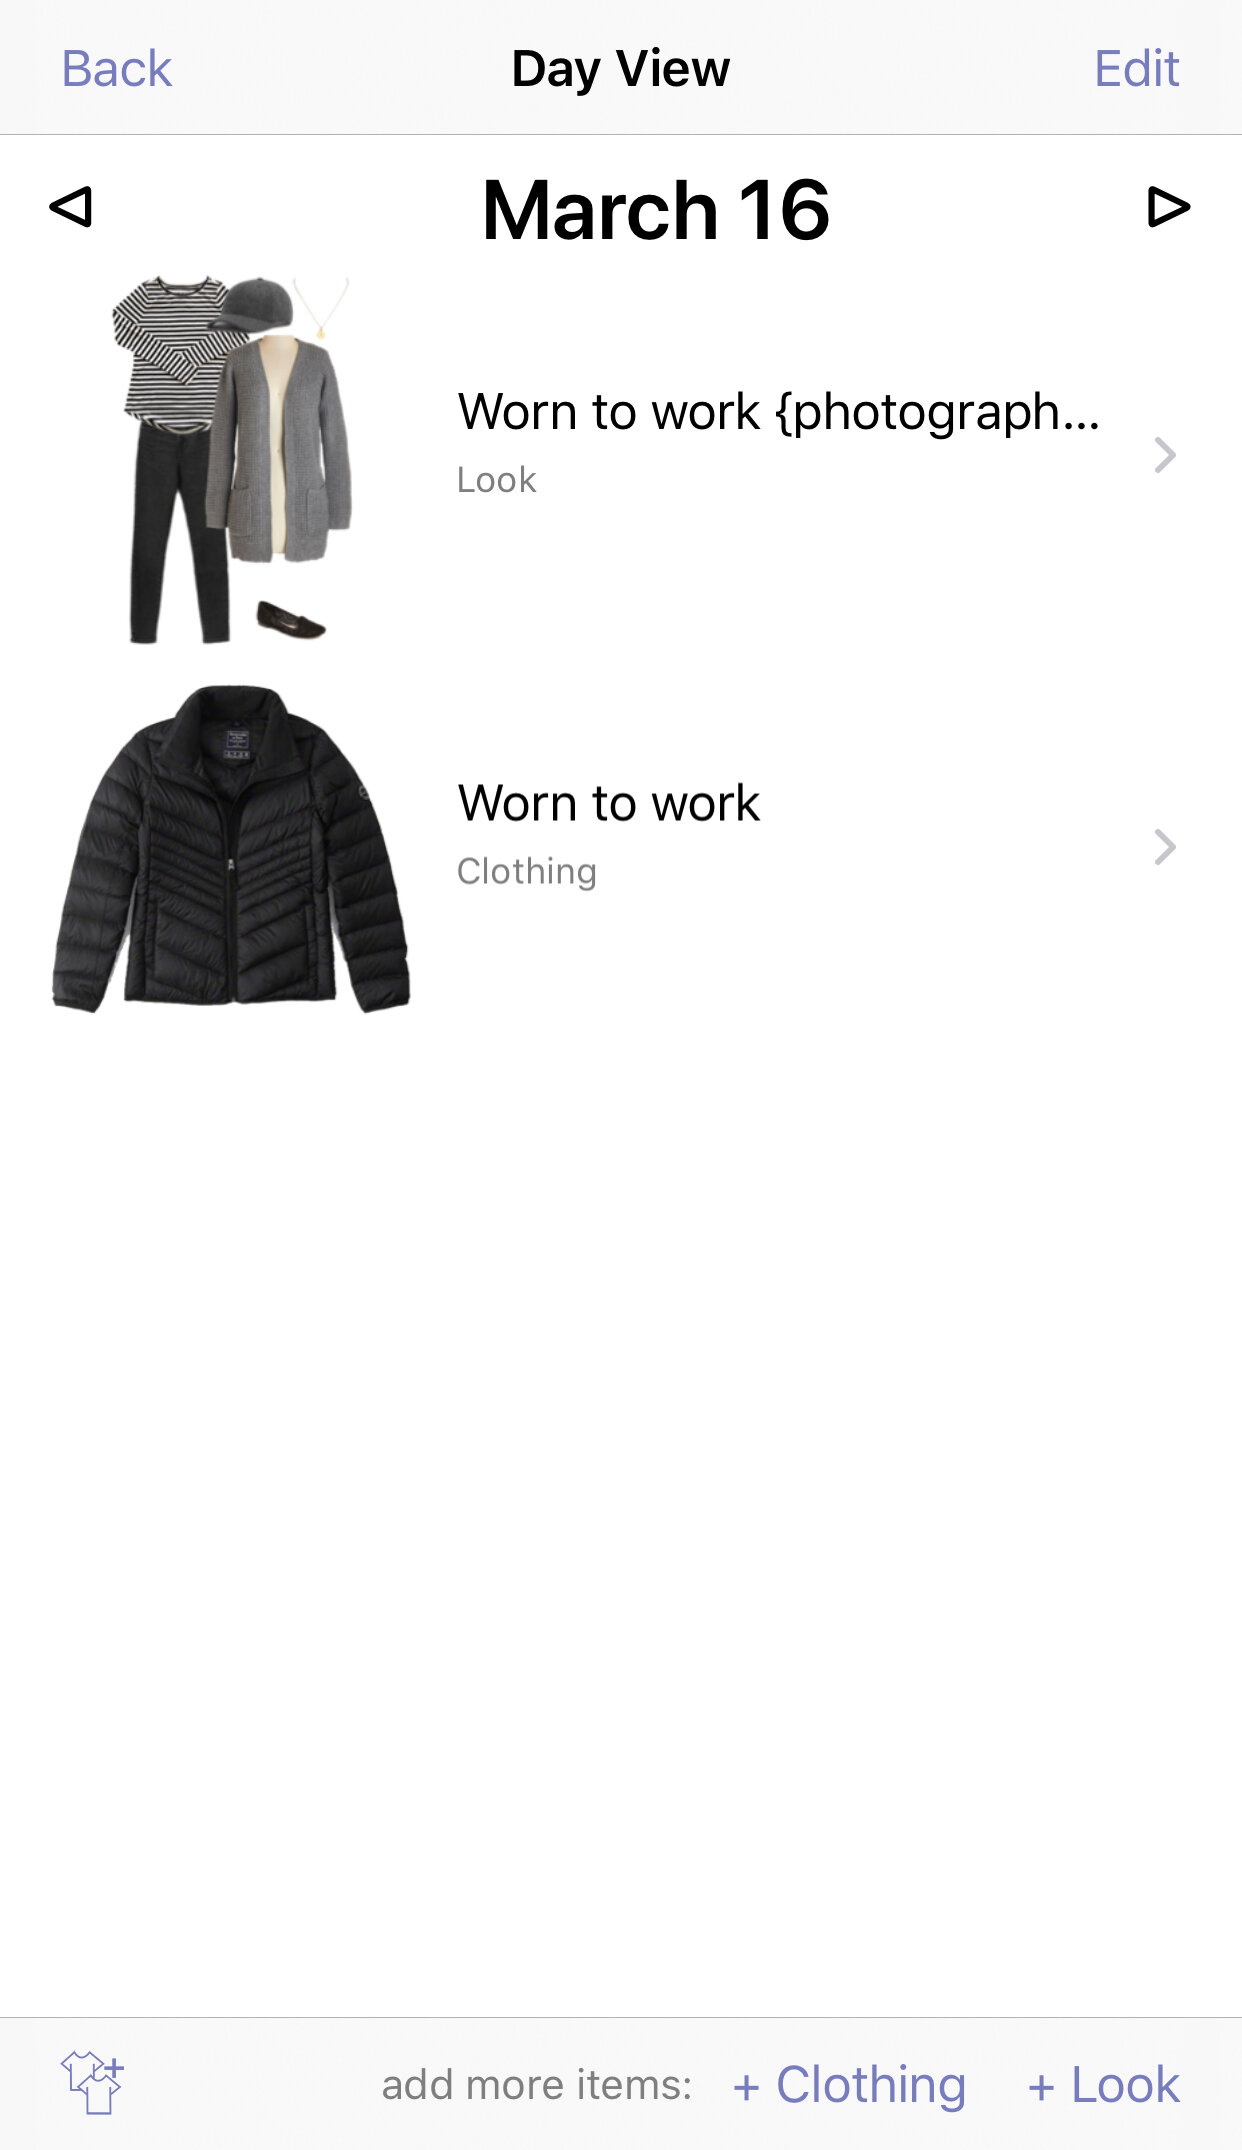
Just like with individual items, you can add notes to individual outfits, and you can add notes on the individual calendar entries! On the calendar entries, I write where I wore the outfit, and I also make a note if I photographed the outfit for my blog. You can search the calendar entries, so be as specific as you’d like! On the individual outfits, I’ll also note if it was a blogged outfit so that I can easily search “blogged” and all of the outfits I blogged will pull up. I didn’t count them all, but it’s a lot!
Does Stylebook Suggest Outfits?
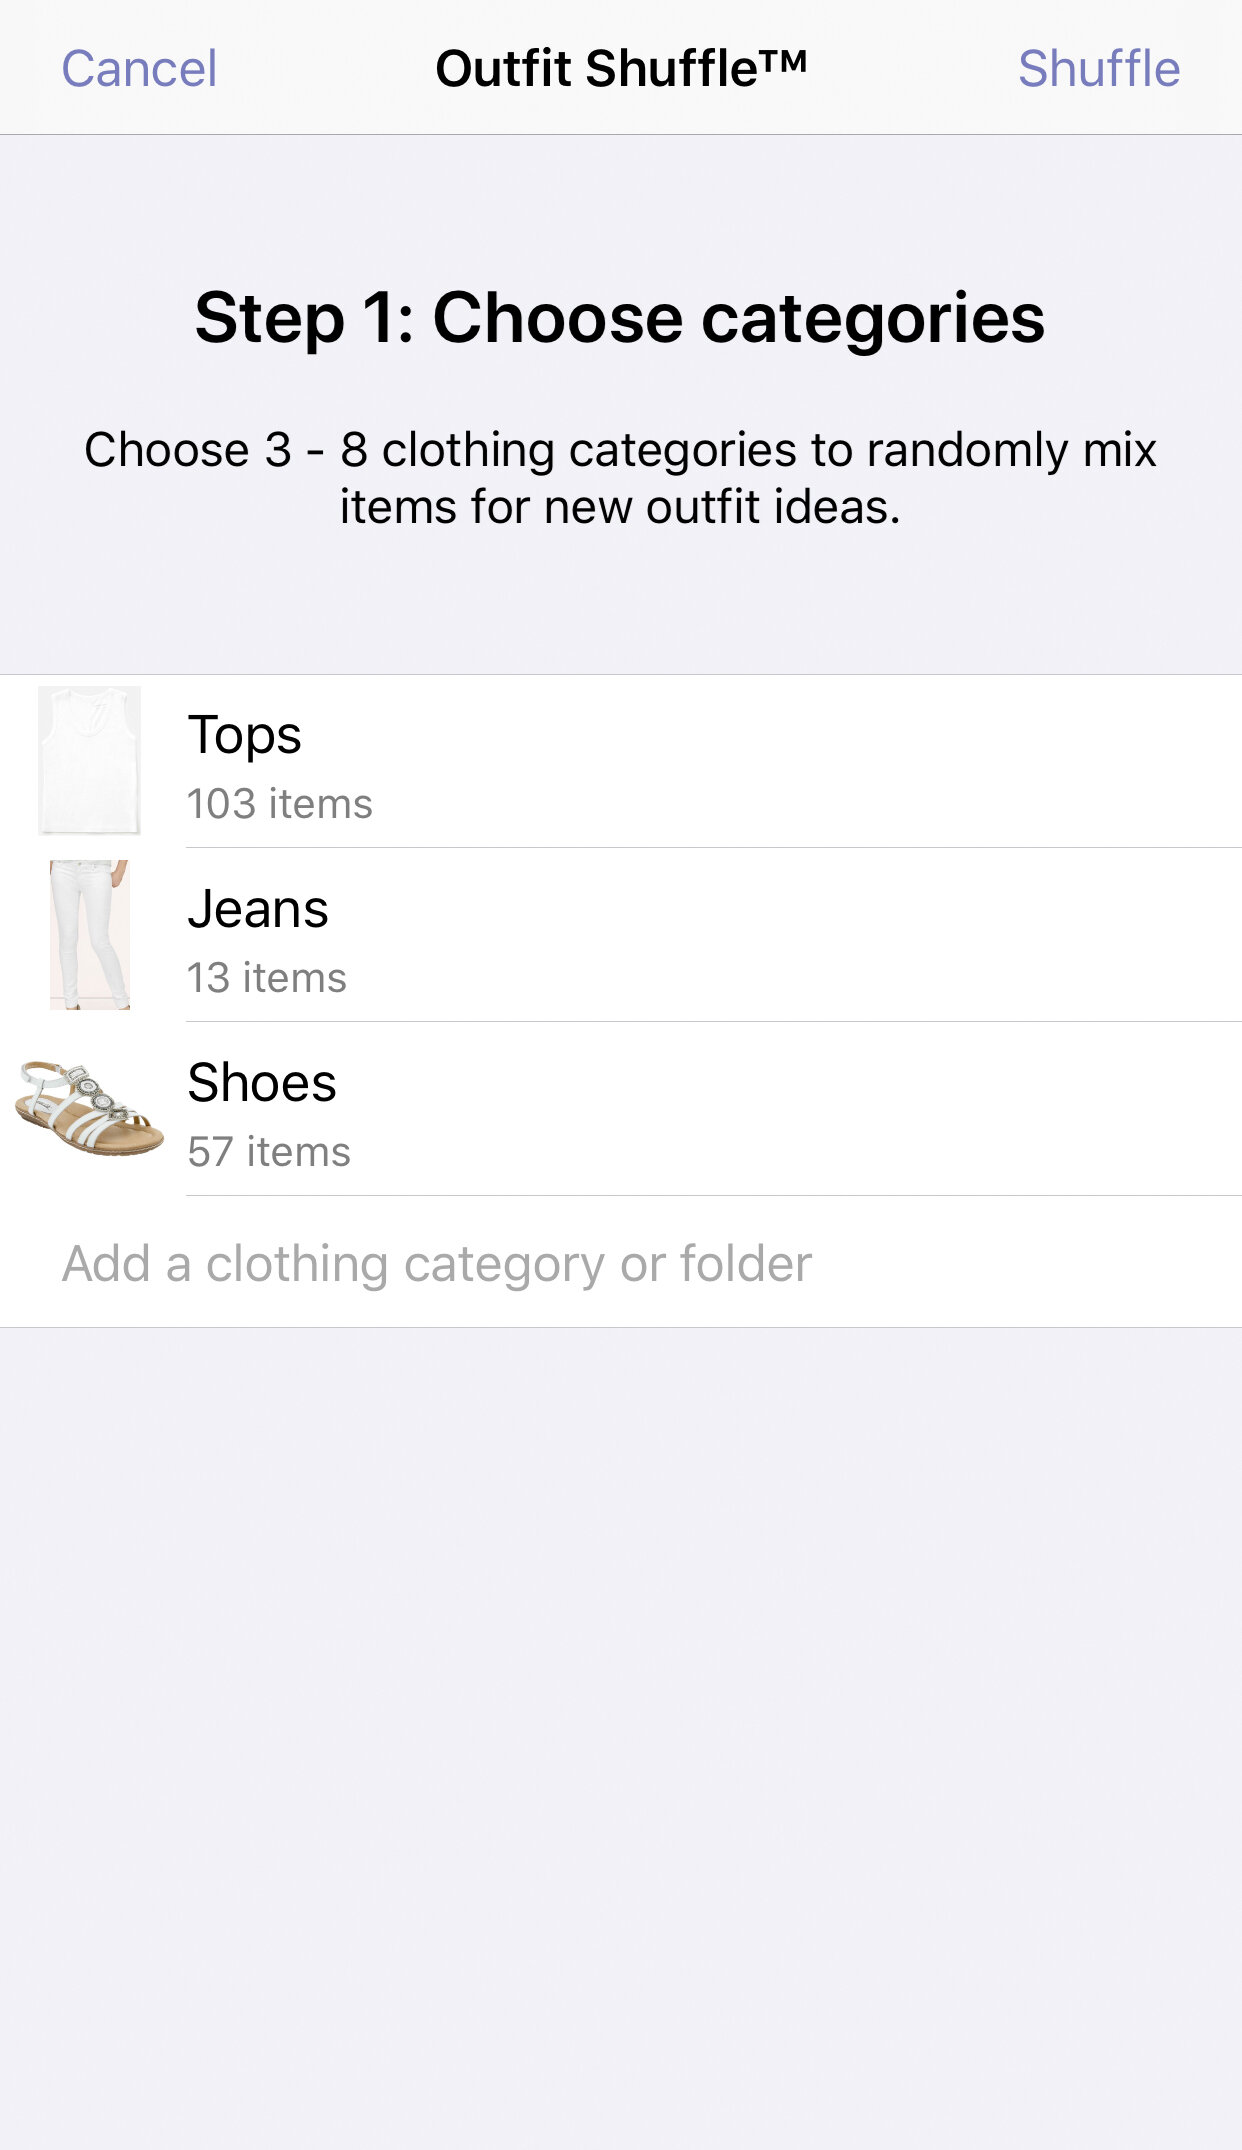
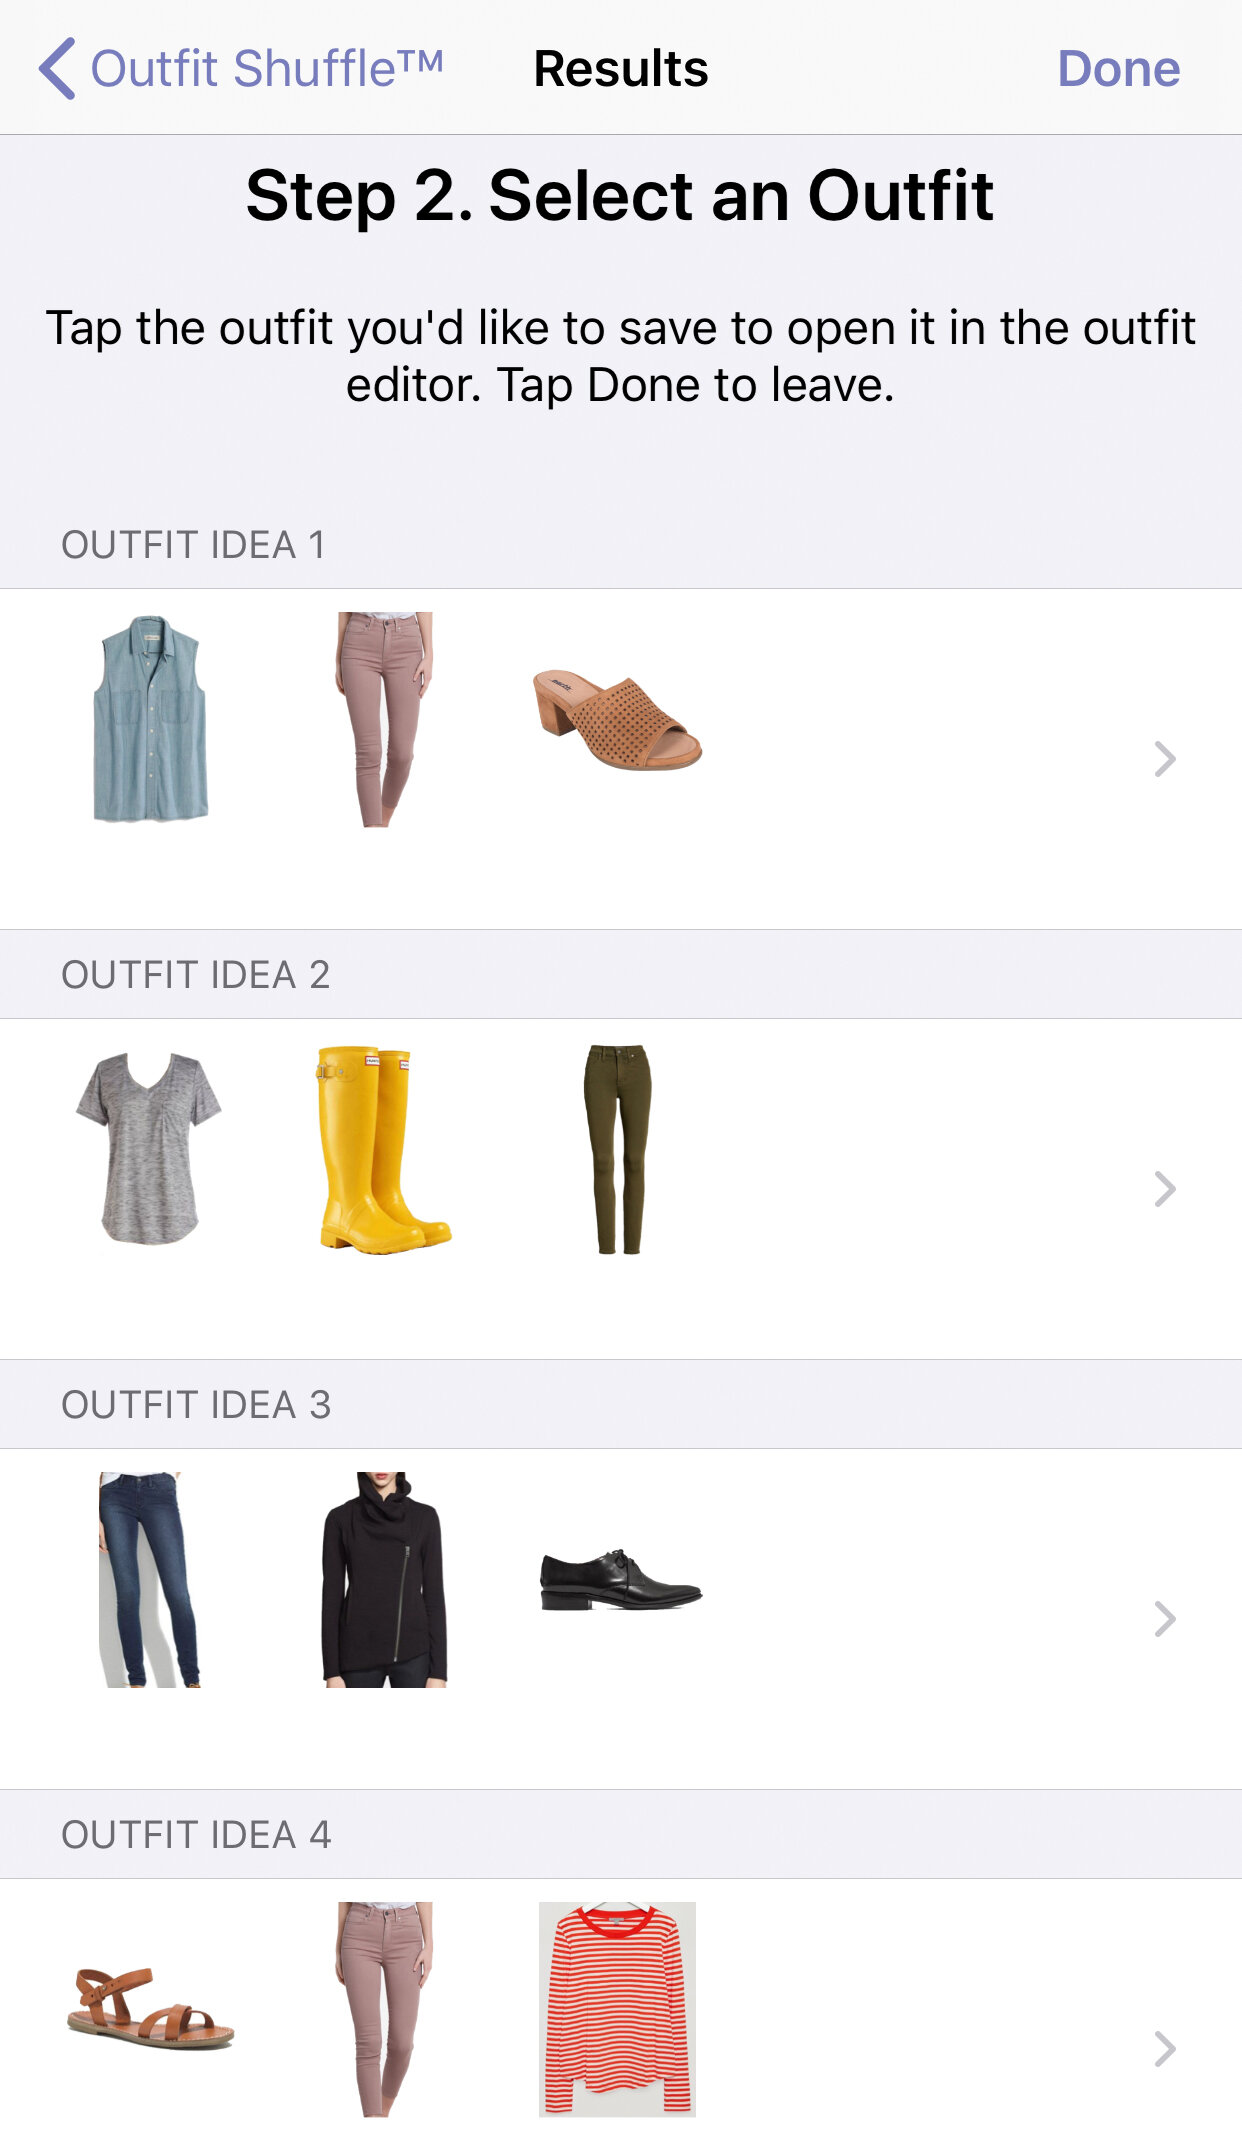
The closest Stylebook gets to suggesting outfits for you is with the Outfit Shuffle feature. You can find it by clicking on the criss-cross lines at the top right of the Looks page or on an individual Looks category page (see the top two photos above). You can select broad categories or more specific subcategories, hit “Shuffle”, and 10 random outfit combinations will appear. Some of the combinations are a little strange, but I do this every once in a while if I’m running low on outfit ideas just in case it combines some pieces that I hadn’t thought to combine already.
I’m not a fan of the “streak” stat at the bottom of the month view that was added the last time the app was updated. I feel too much pressure to keep the streak going and it doesn’t help me better understand what I wear. I’d much rather see a useful stat like “number of unique items worn”!
How to Use Packing Lists in Stylebook
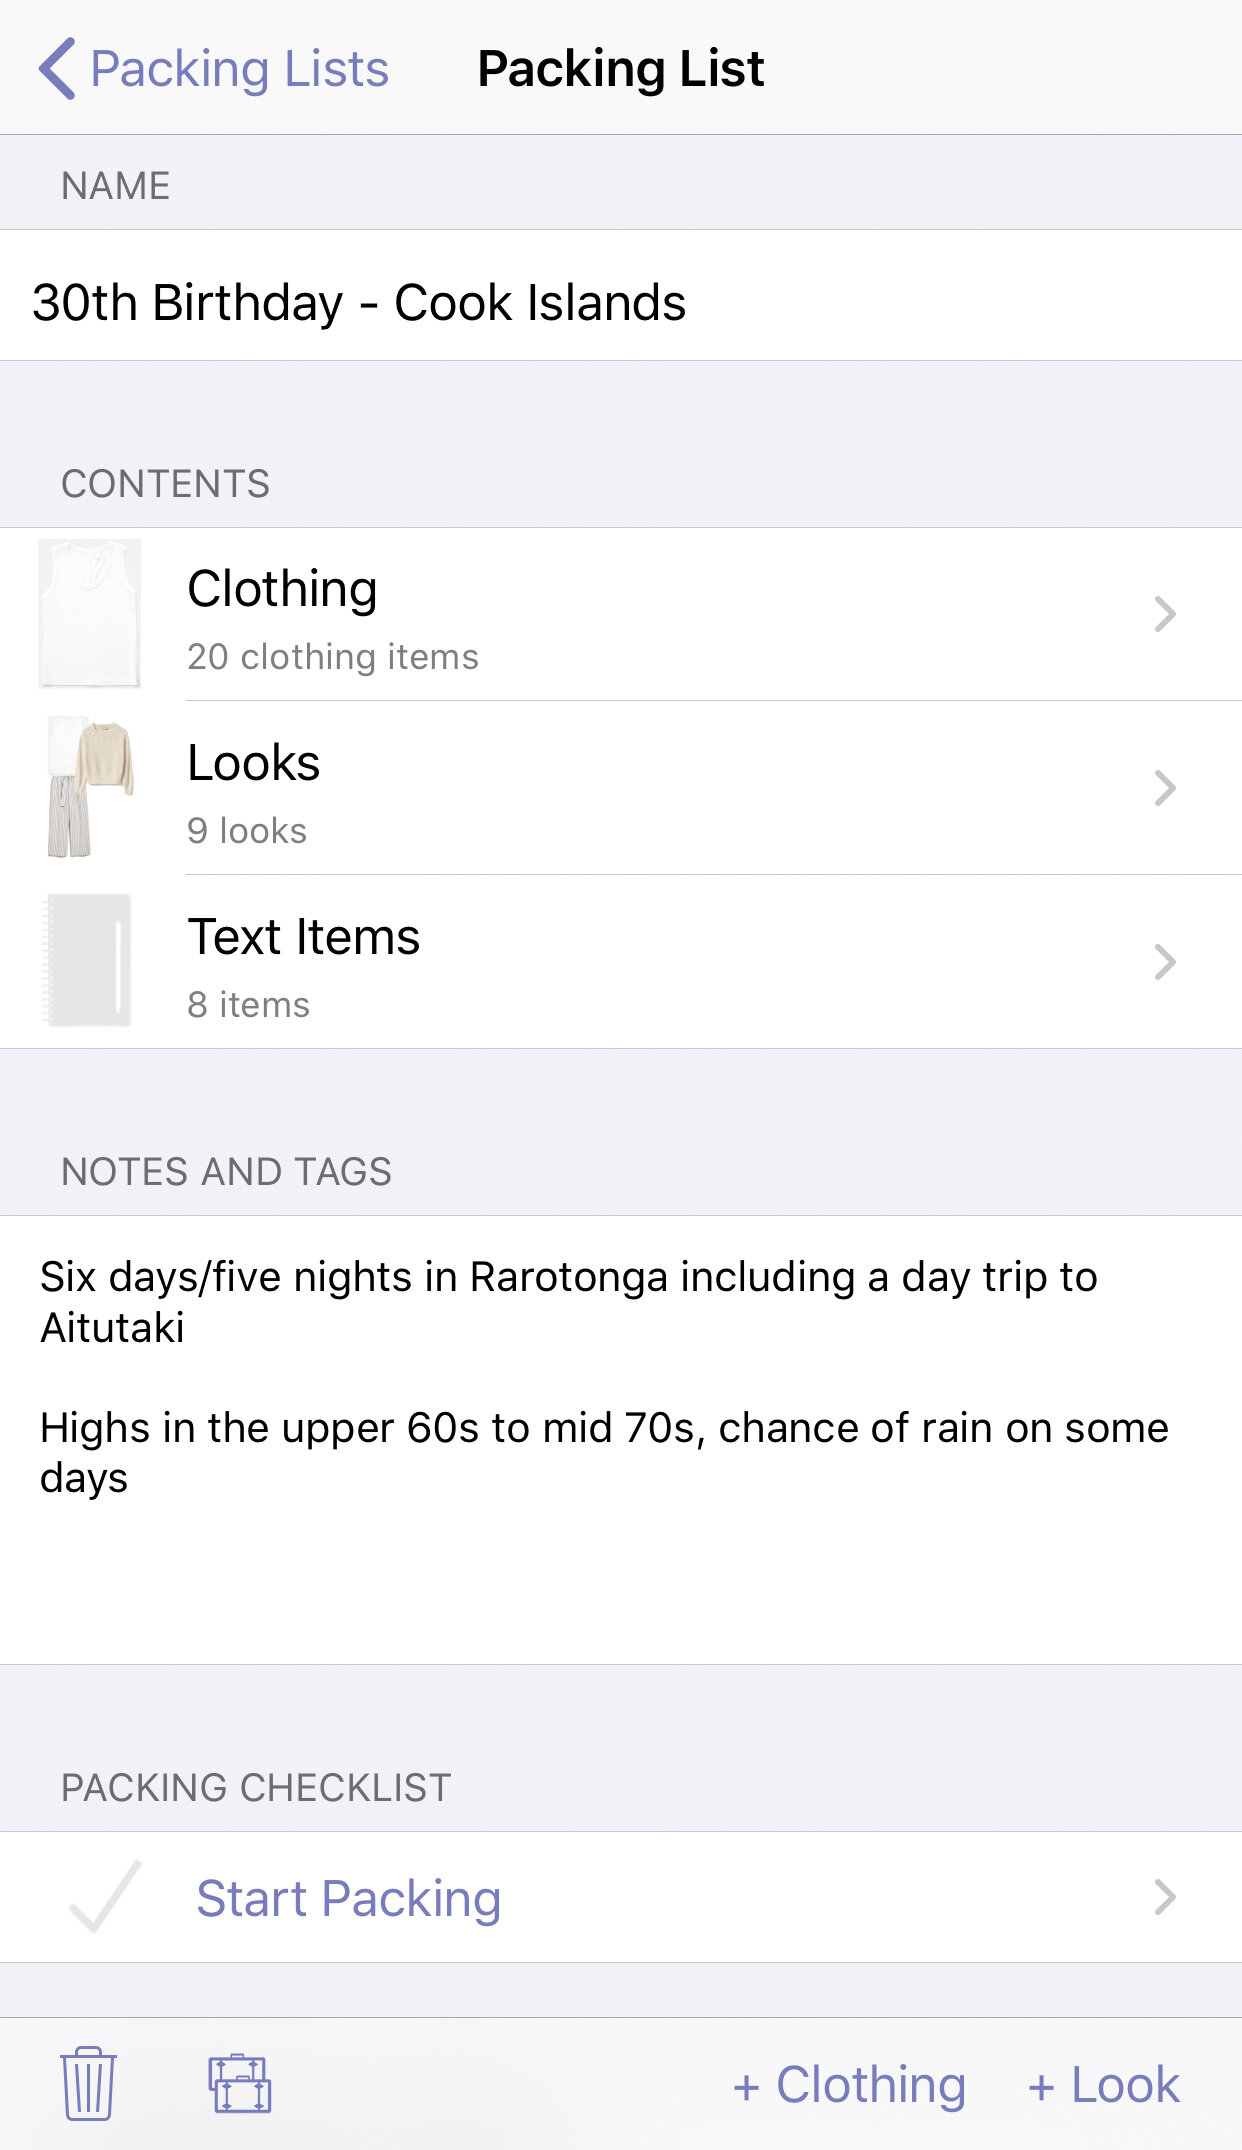
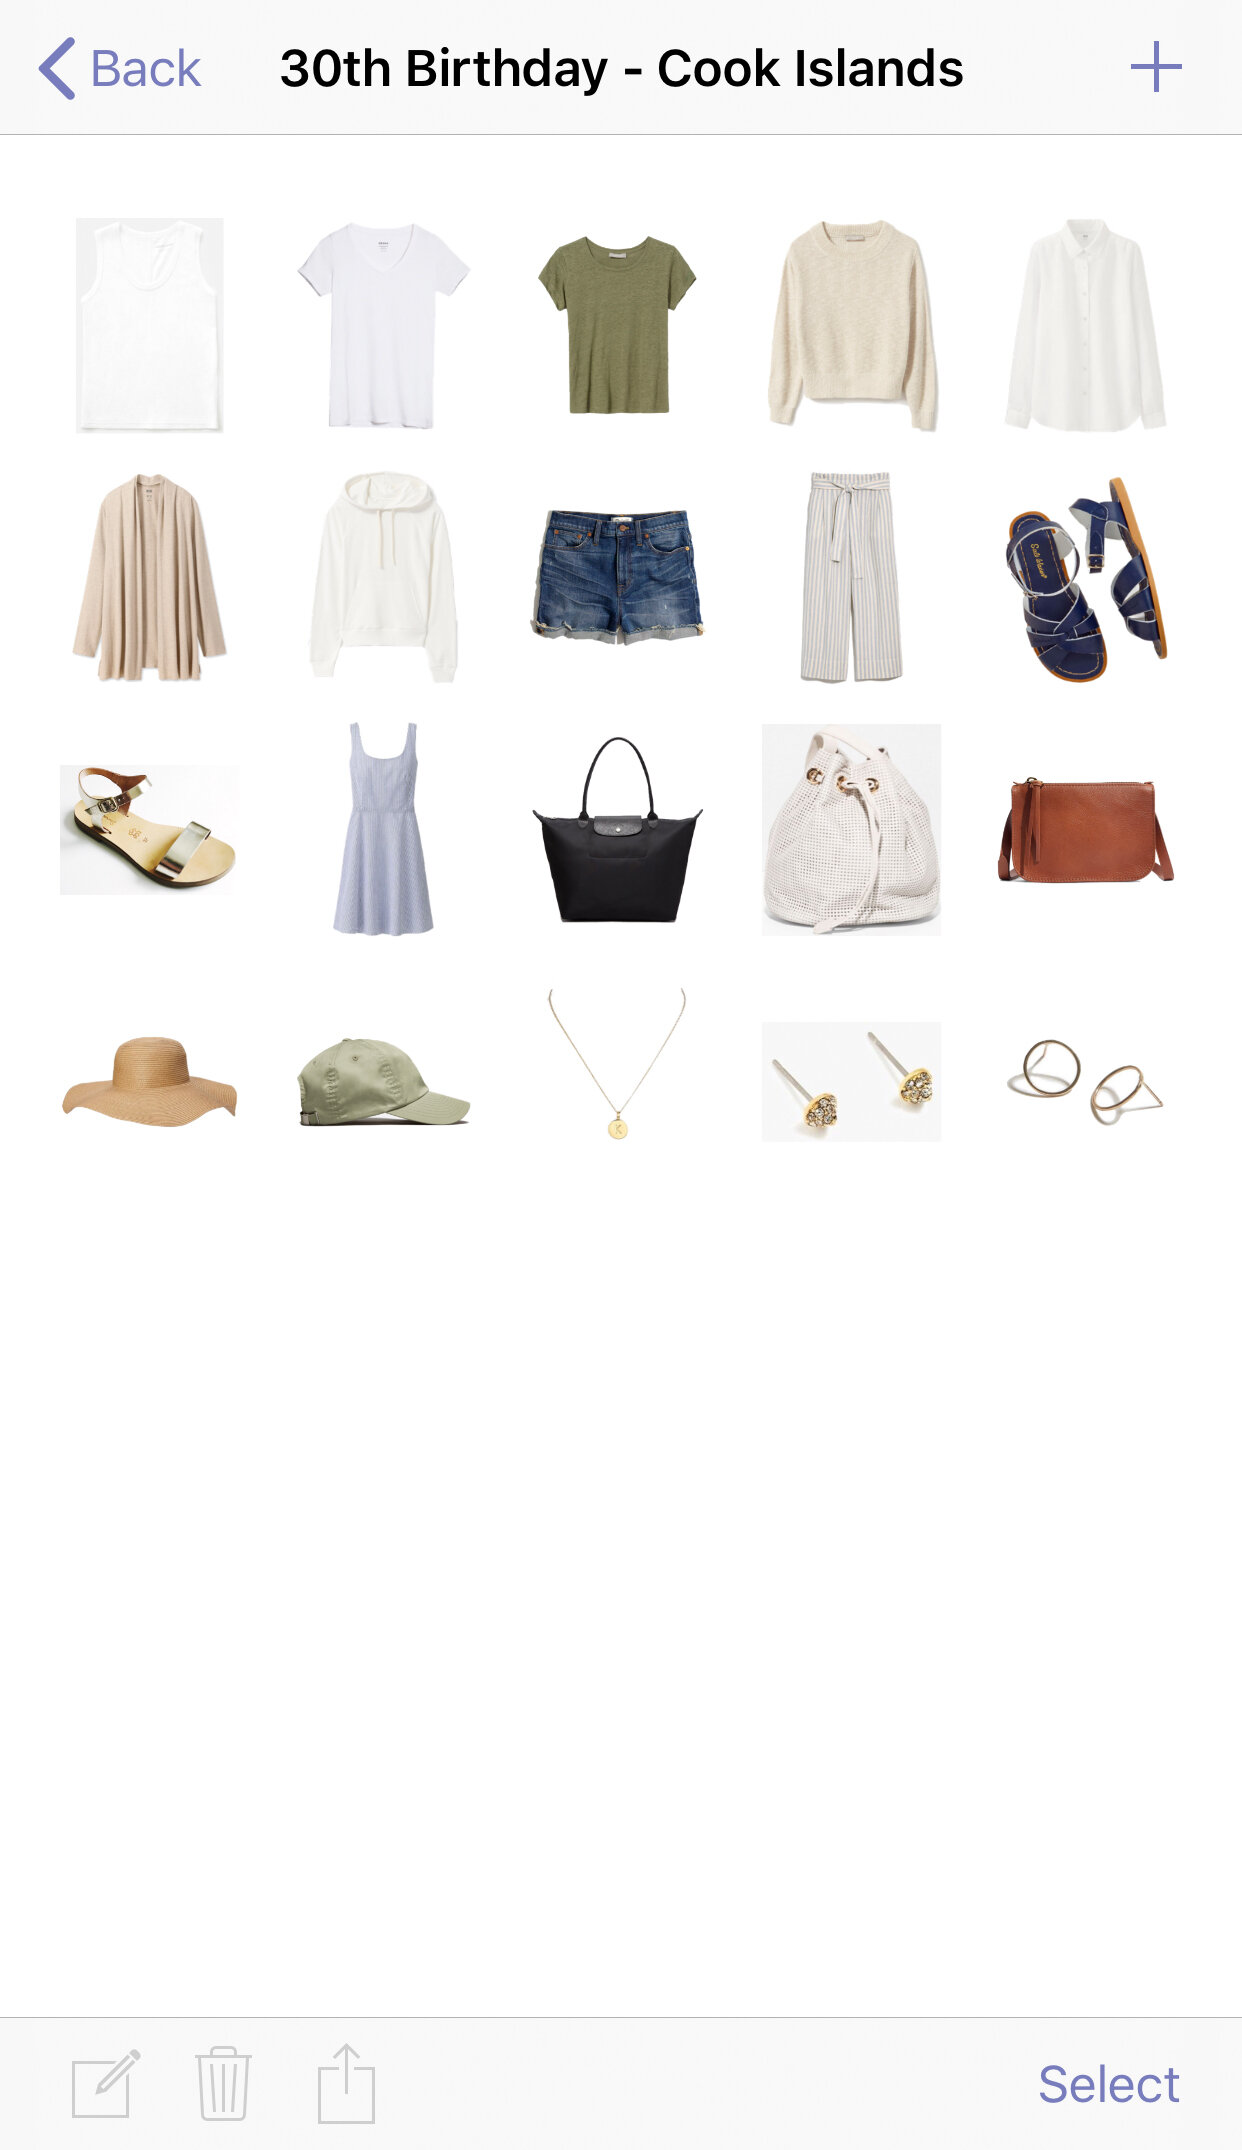
The packing lists feature is really cool and exceptionally helpful when it comes to packing for a trip! It’s pretty straightforward: add your items and/or add your looks (I don’t add looks until after I’ve put them together and worn them on my trip), add any extra non-clothing items in the text items section, and make any notes. I like to note where I’m traveling and the weather.
If you add a look that has an item that isn’t in your packing list, the app will ask if you want it to be added to your packing list. This is helpful if you want to pack by look instead of by item; the app will automatically add any items in your looks to your list!
Once you have your list finalized, you can click on “Start Packing” and a checklist will pop up that you can cross off as you pack! There is also a printable checklist available.

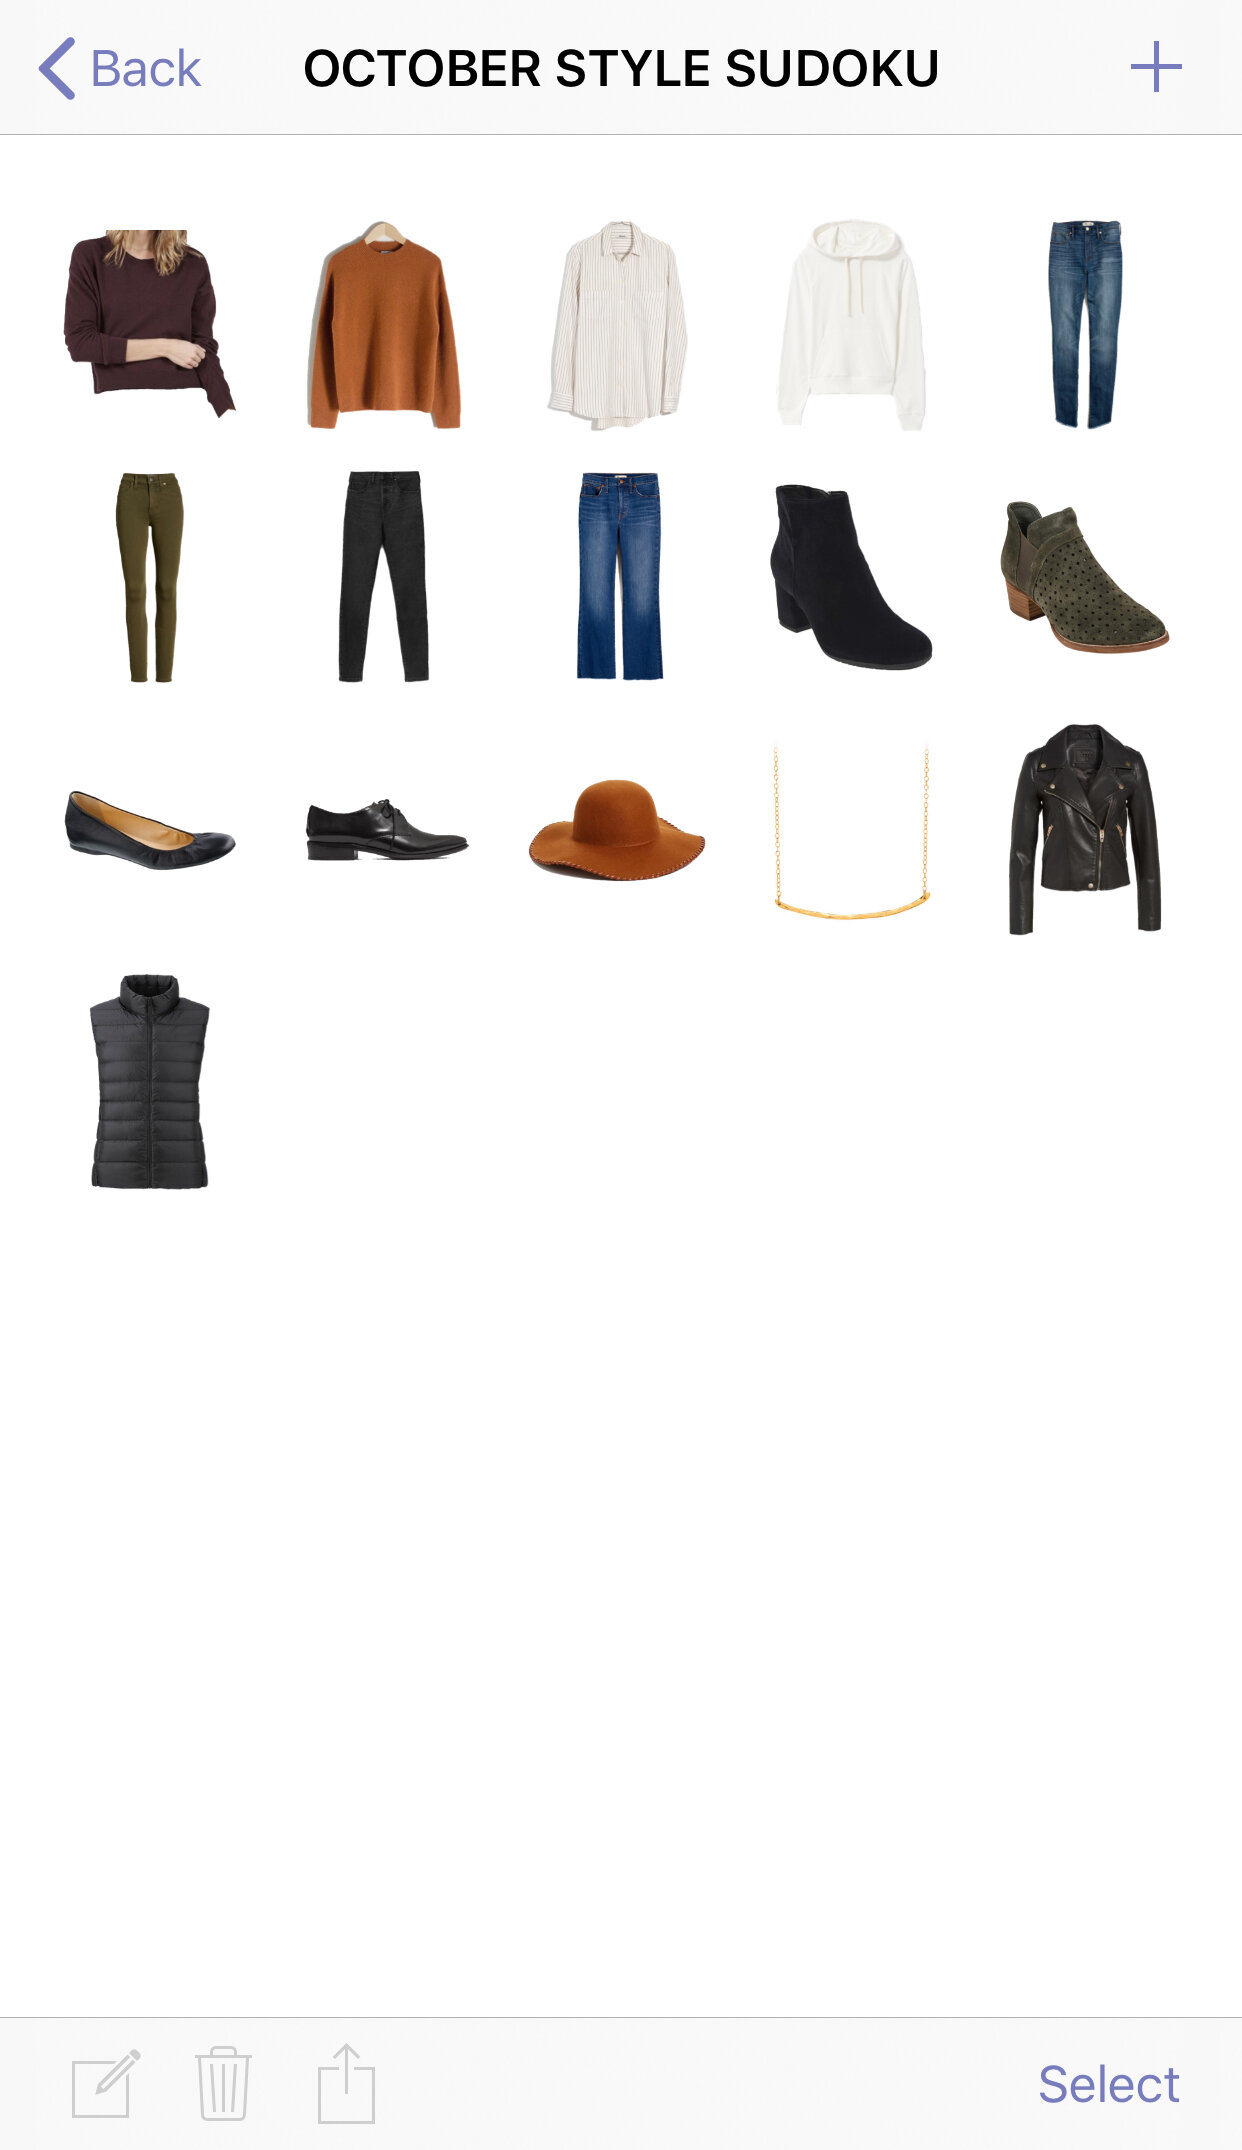
In addition to trips, I love using the packing list feature for organizing my style challenges, including my style sudokus. The packing lists allow me to keep track of all of my style sudoku items and outfits in one place, which is super helpful for seeing exactly what I wore because otherwise the outfits will get lost in the sea of my other outfits in the Looks categories.
For more on how I used packing lists in the past, check out: what to pack for a week in Cabo in December, what I packed for a week-long work trip, what to pack for a week in the Florida Keys, six outfits to wear at an academic conference, packing for a long summer road trip, and packing for an academic conference.
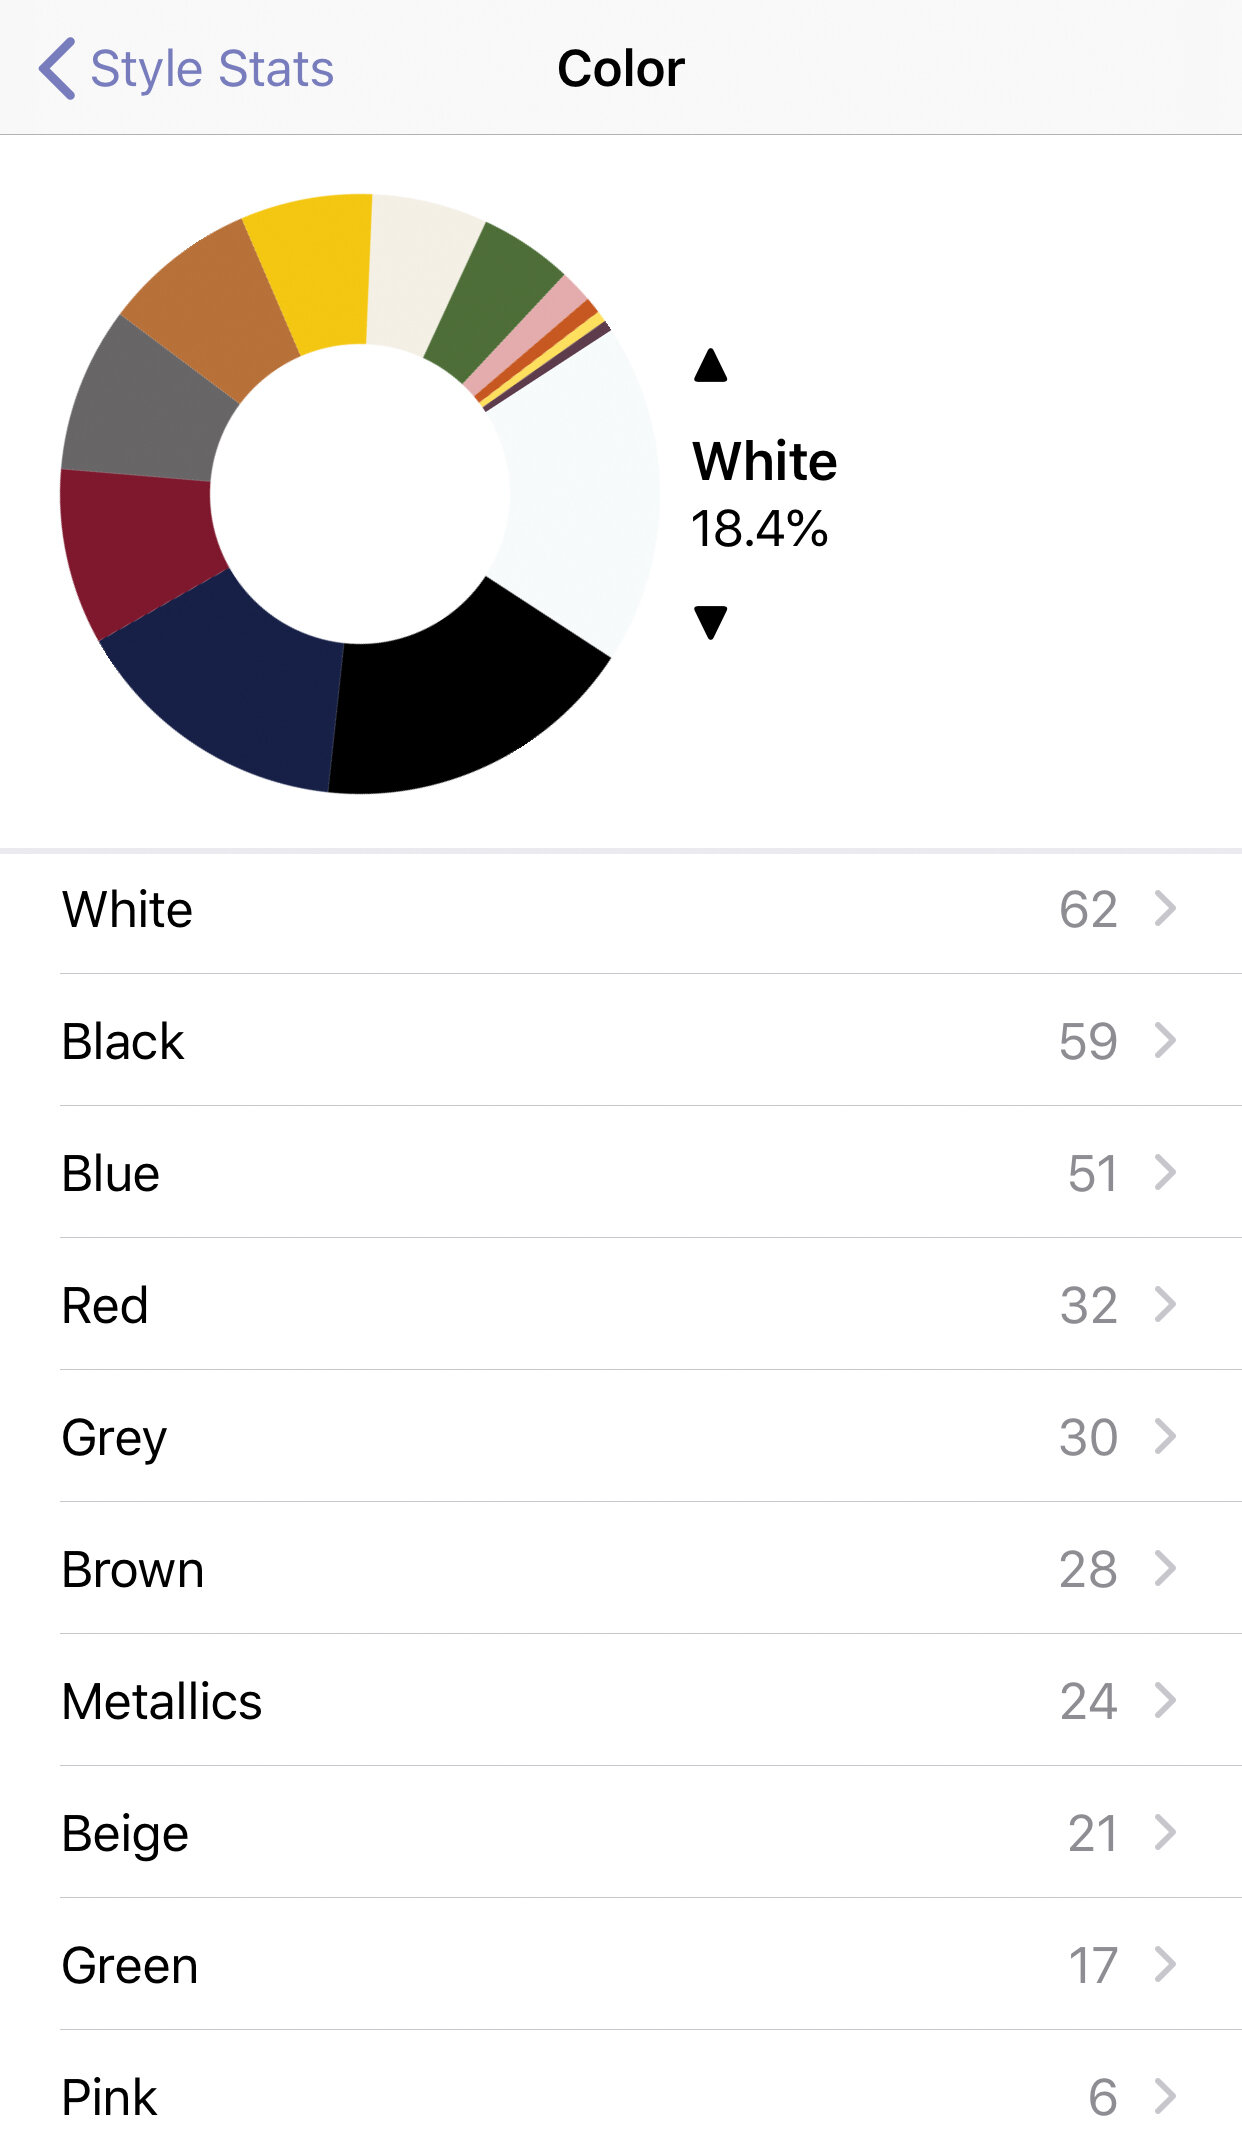
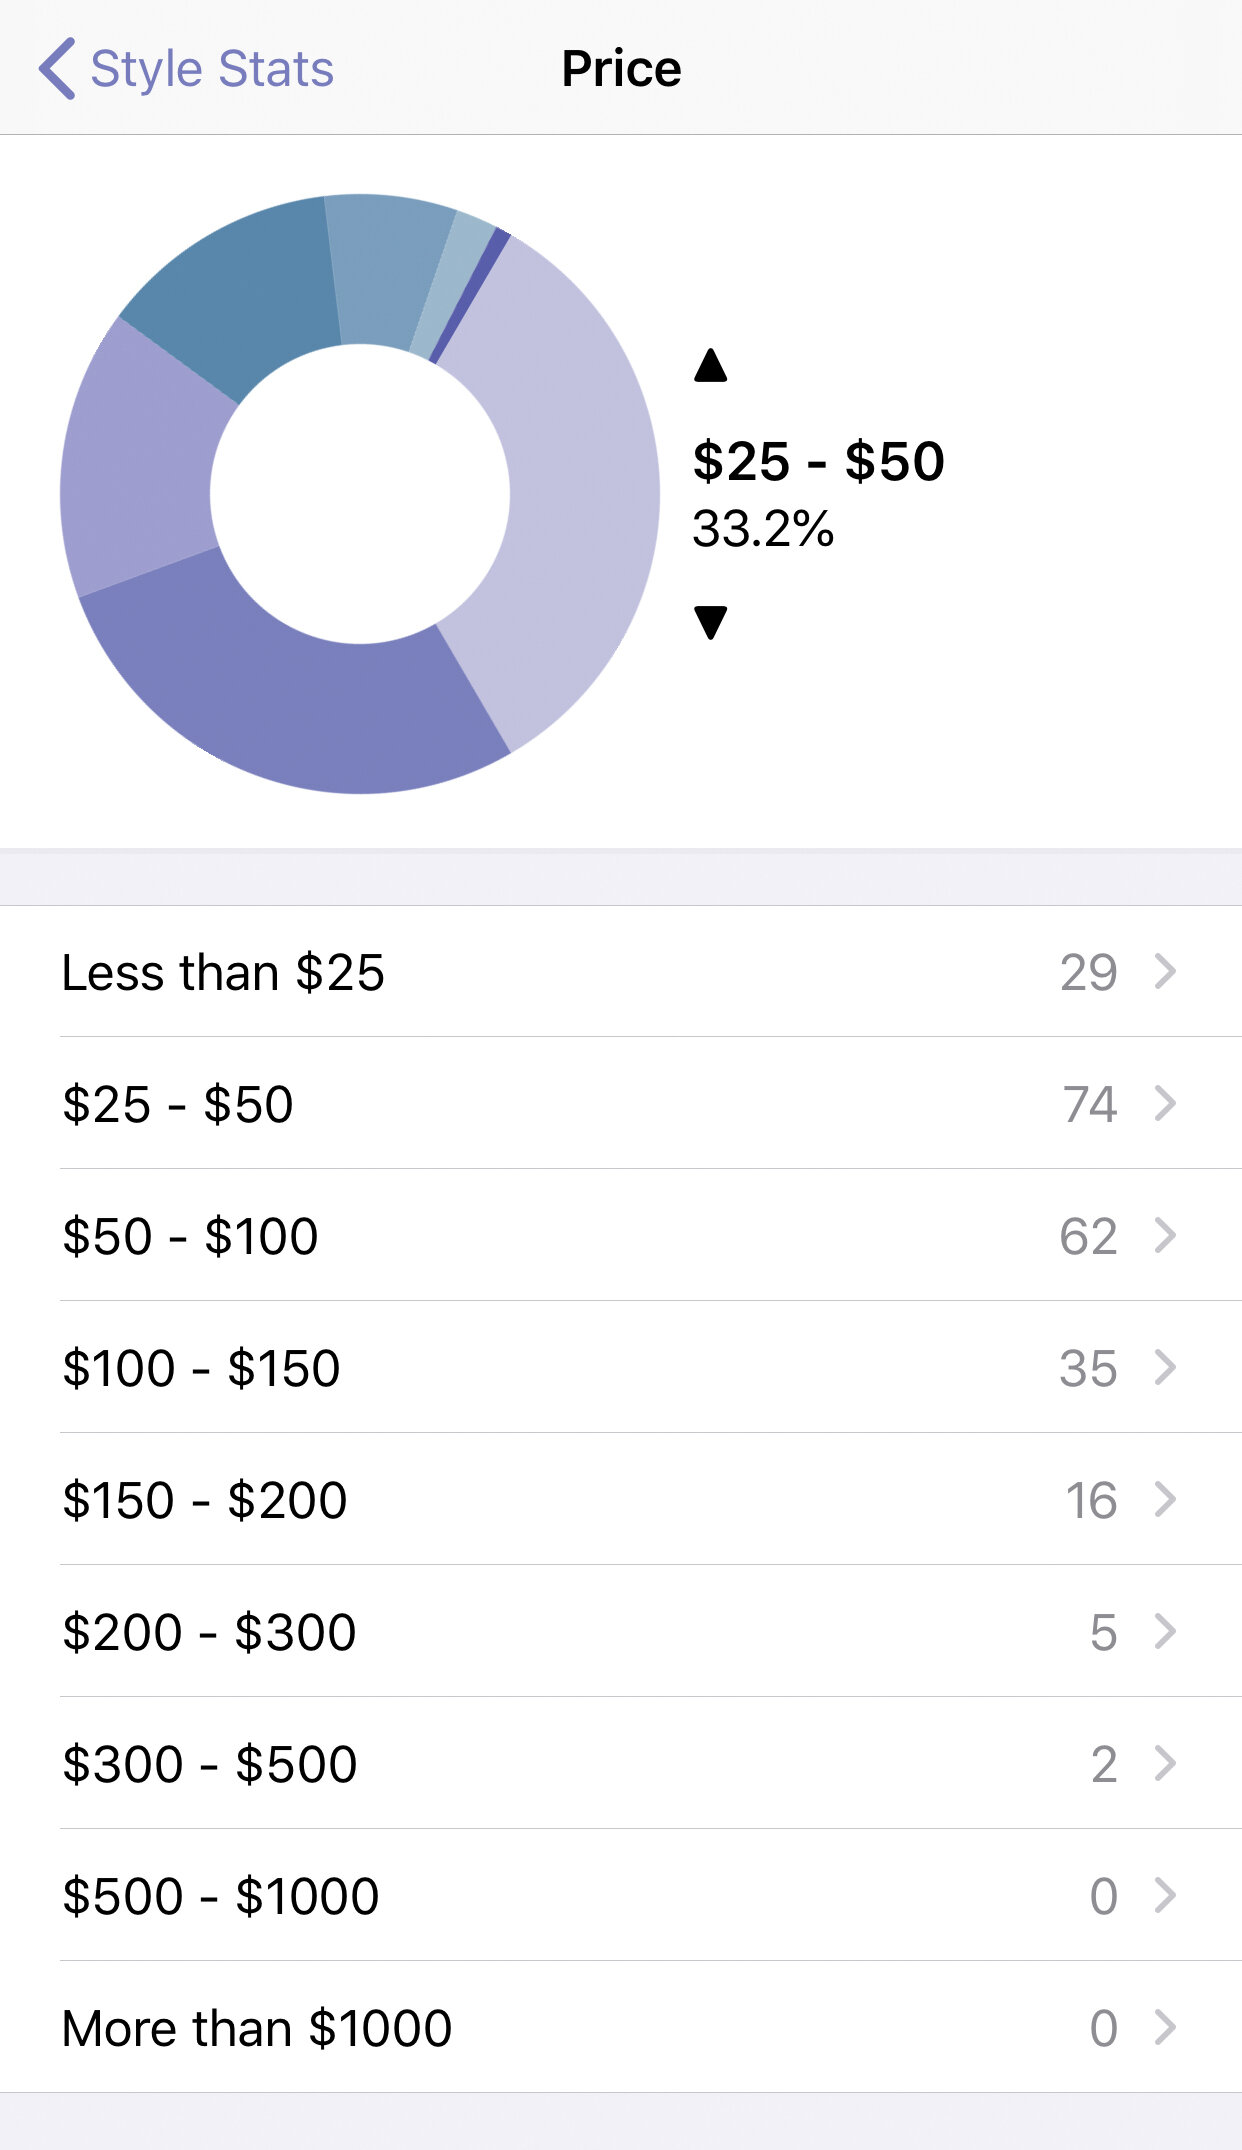
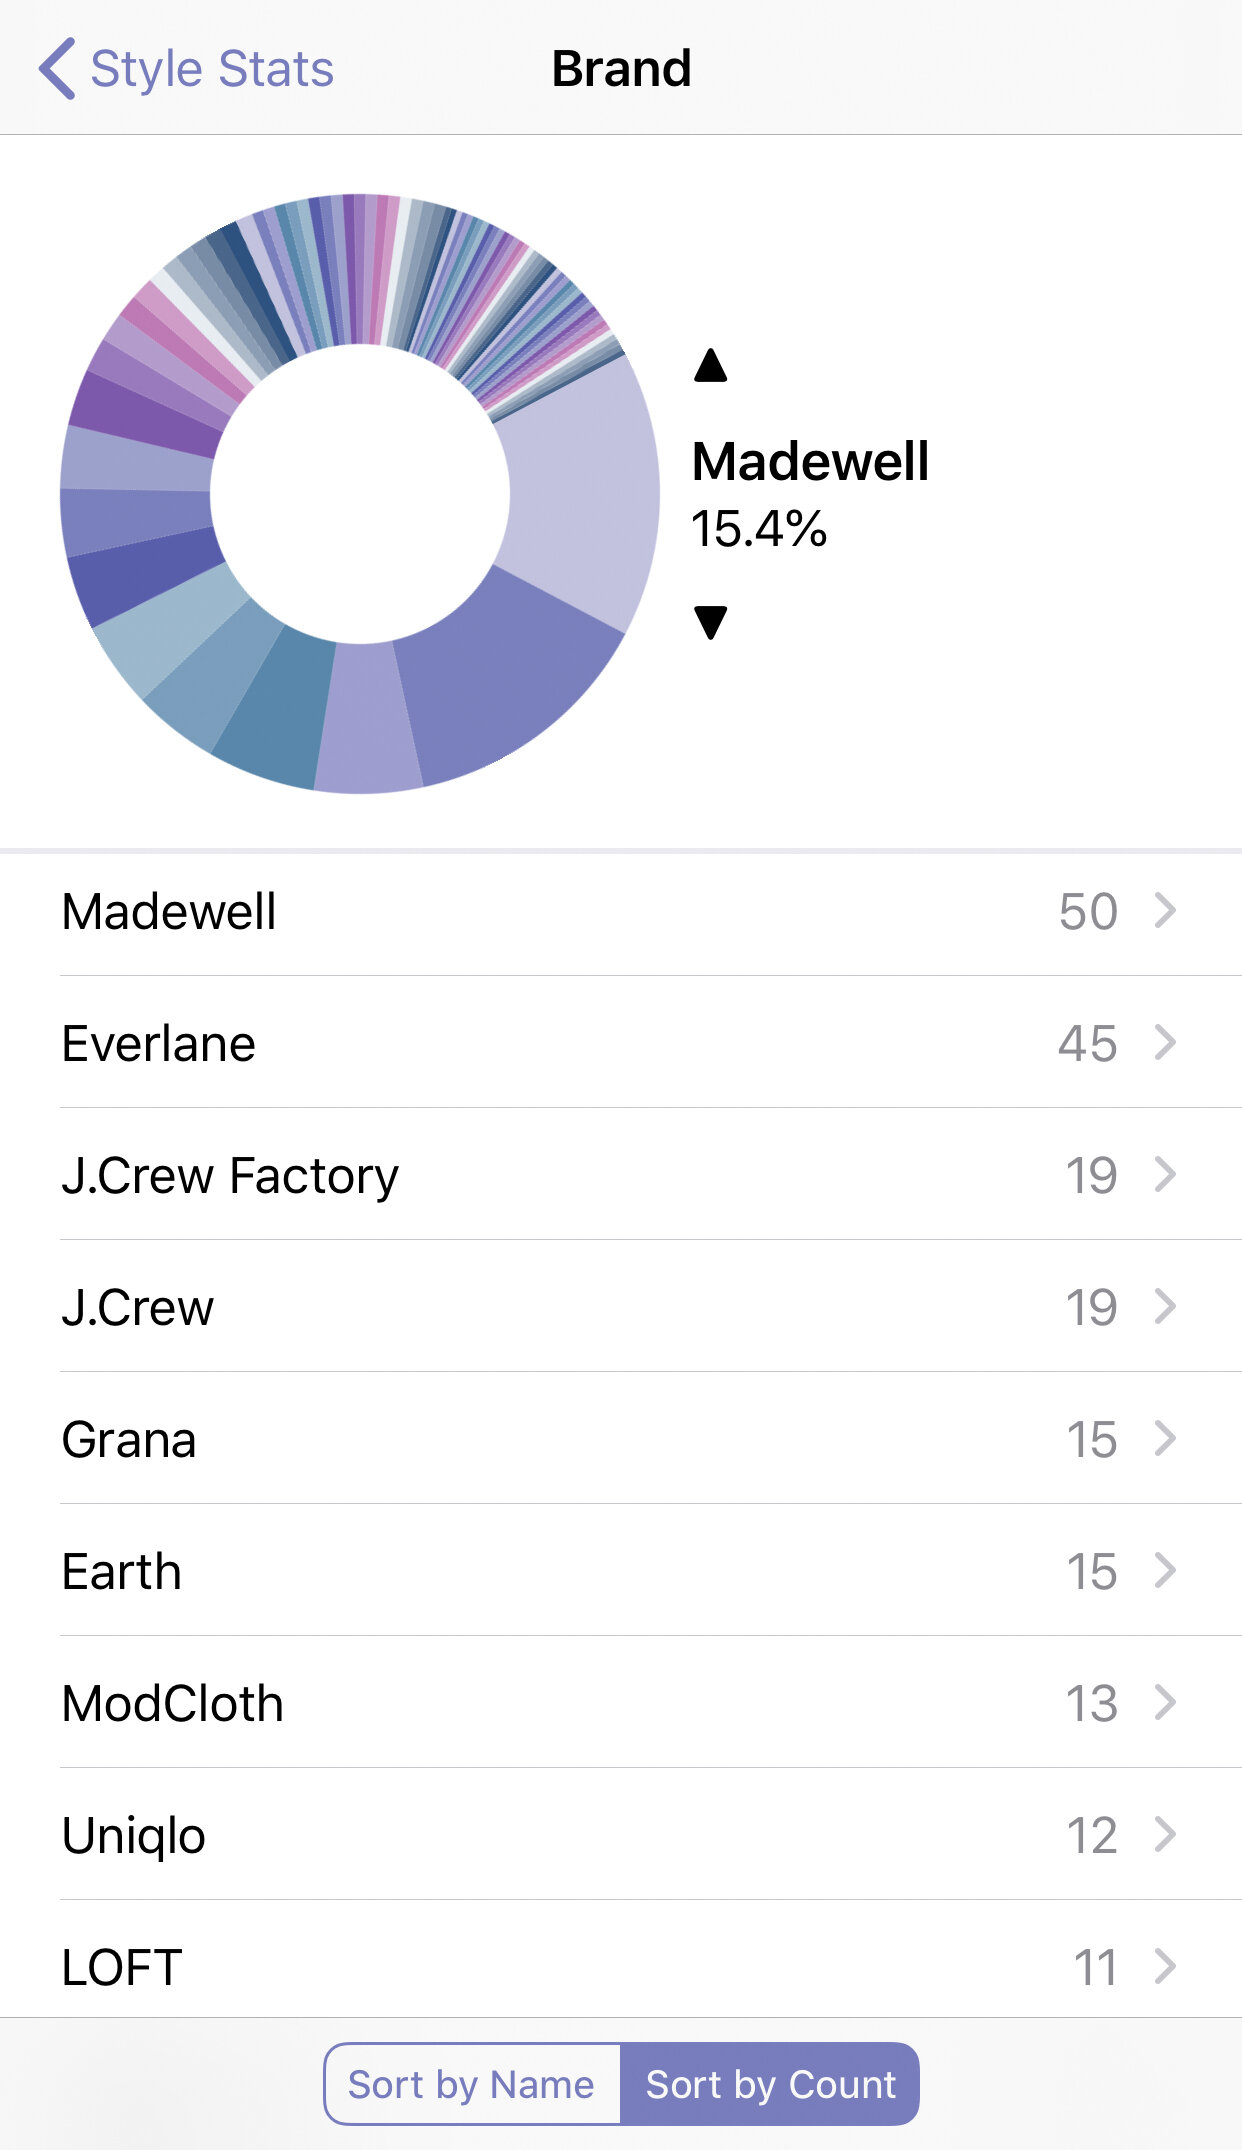
Stylebook App Style Stats
My favorite part of the app is all of the style stats! It’s the math nerd in me, what can I say? (I’ll admit that stats was one of my least favorite math classes, haha. This is fun stats!)
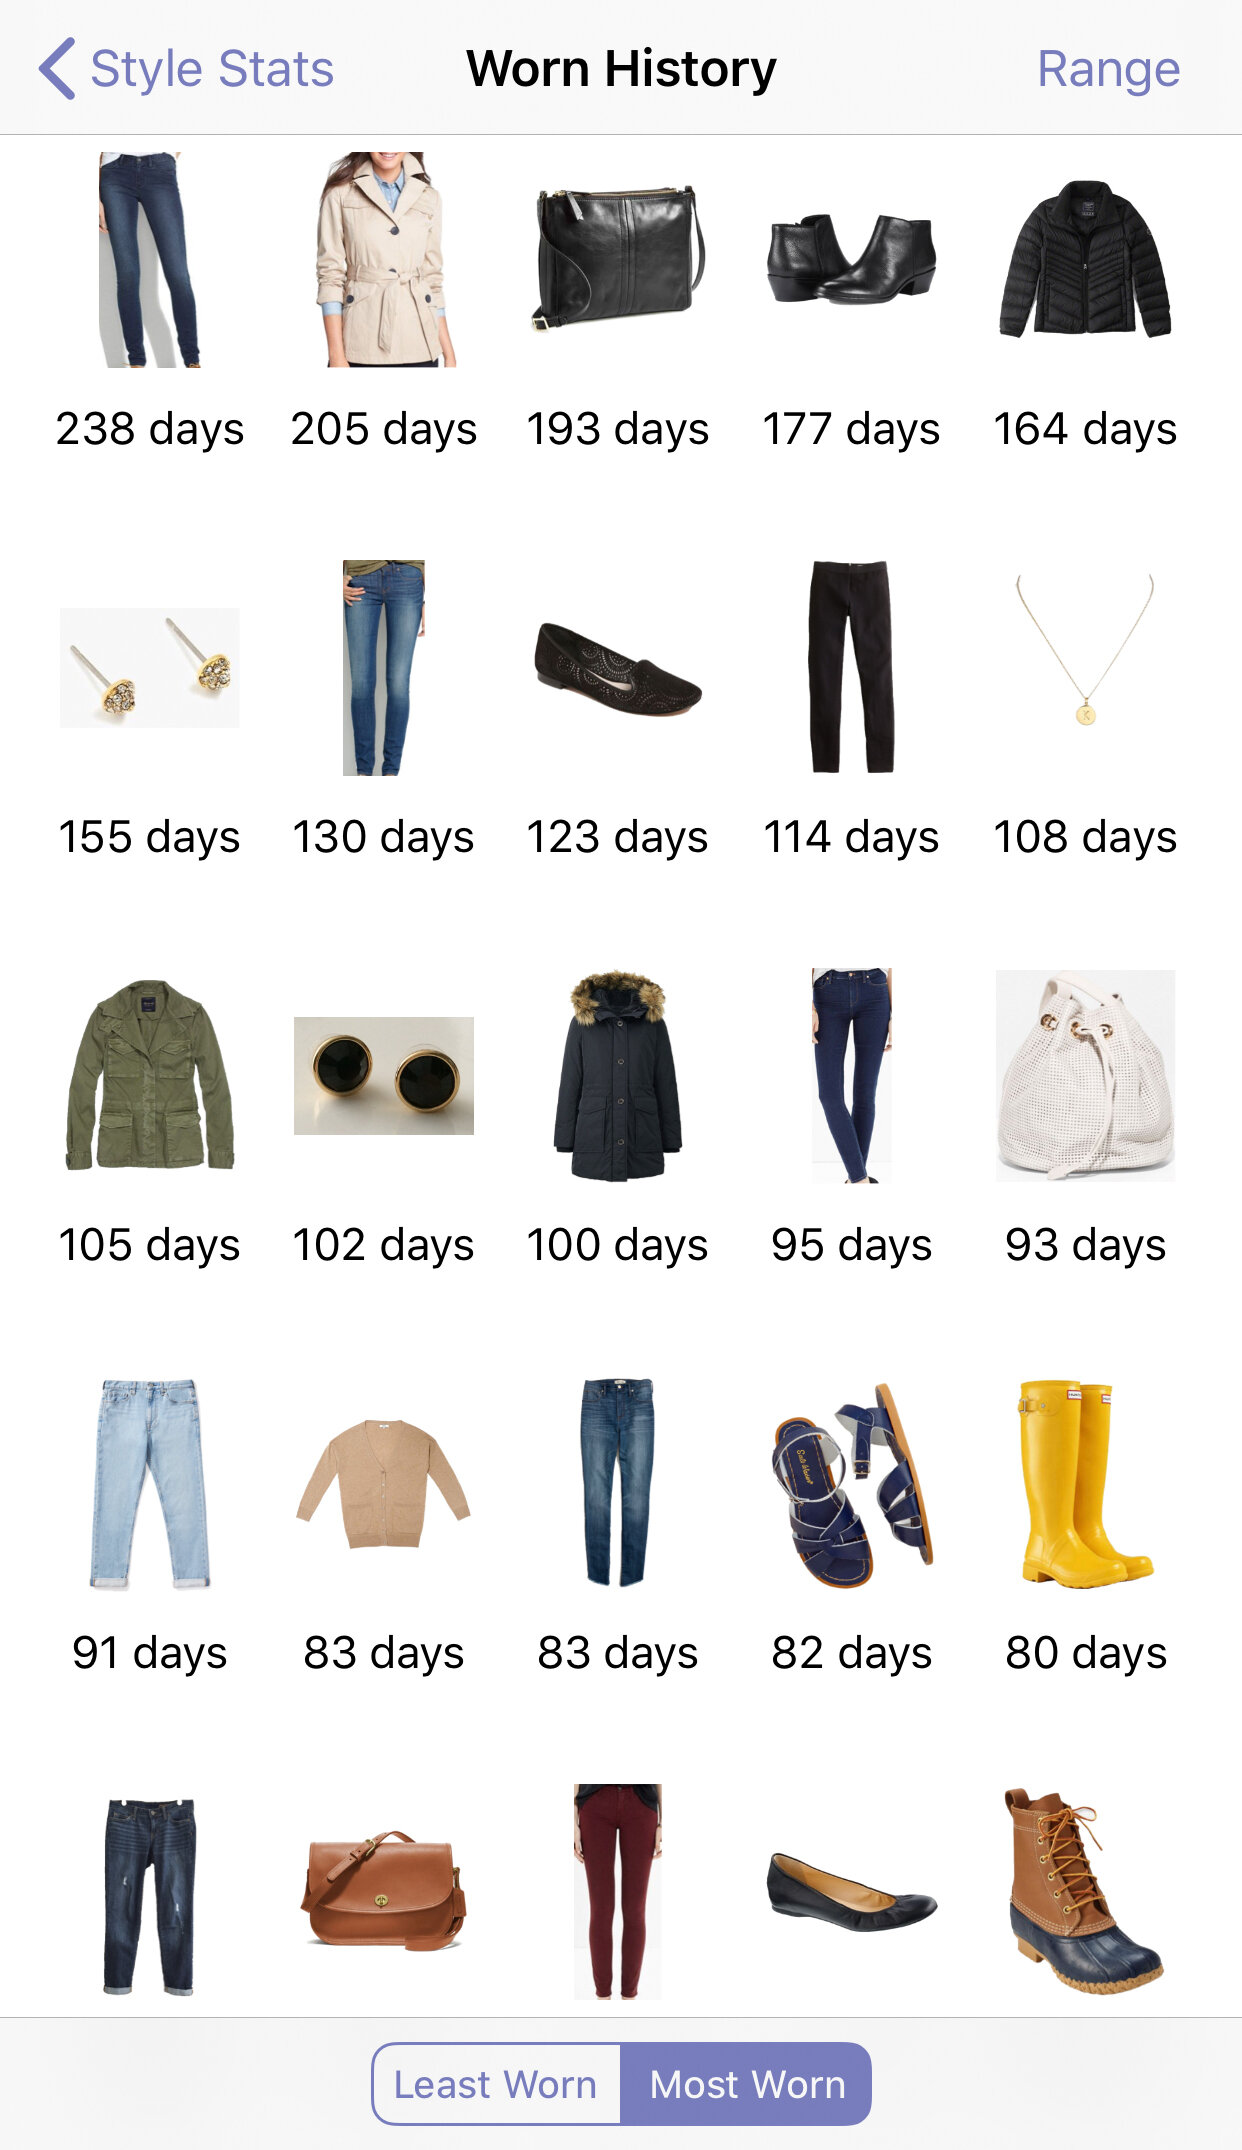
Most of the stats are highly dependent on what details you include for each item in your closet, so the more information you include, the better. Here’s what you can track: most recently added items, most/least worn items and outfits, best and worst cost per wear, items never used in an outfit, items not logged on the calendar, and most packed items The app also provides a closet breakdown by color, price, brand, size, season, etc. The items and outfits not logged on the calendar, most/least worn items, and best/worst cost per wear stats can be further divided into more specific ranges of time, i.e. the last 30 days or the last 1 year.
The “Item Count” stat is skewed by items that you may no longer own (as it is in my case), but I still find it interesting to see that and my “Total Closet Value”. I erased that stat because it is very high (in the low five figures) and low key embarrassing, haha. That stat is also a little skewed because I often include the total price of items I purchase with a gift card, receive as gifts, or receive courtesy of a brand.

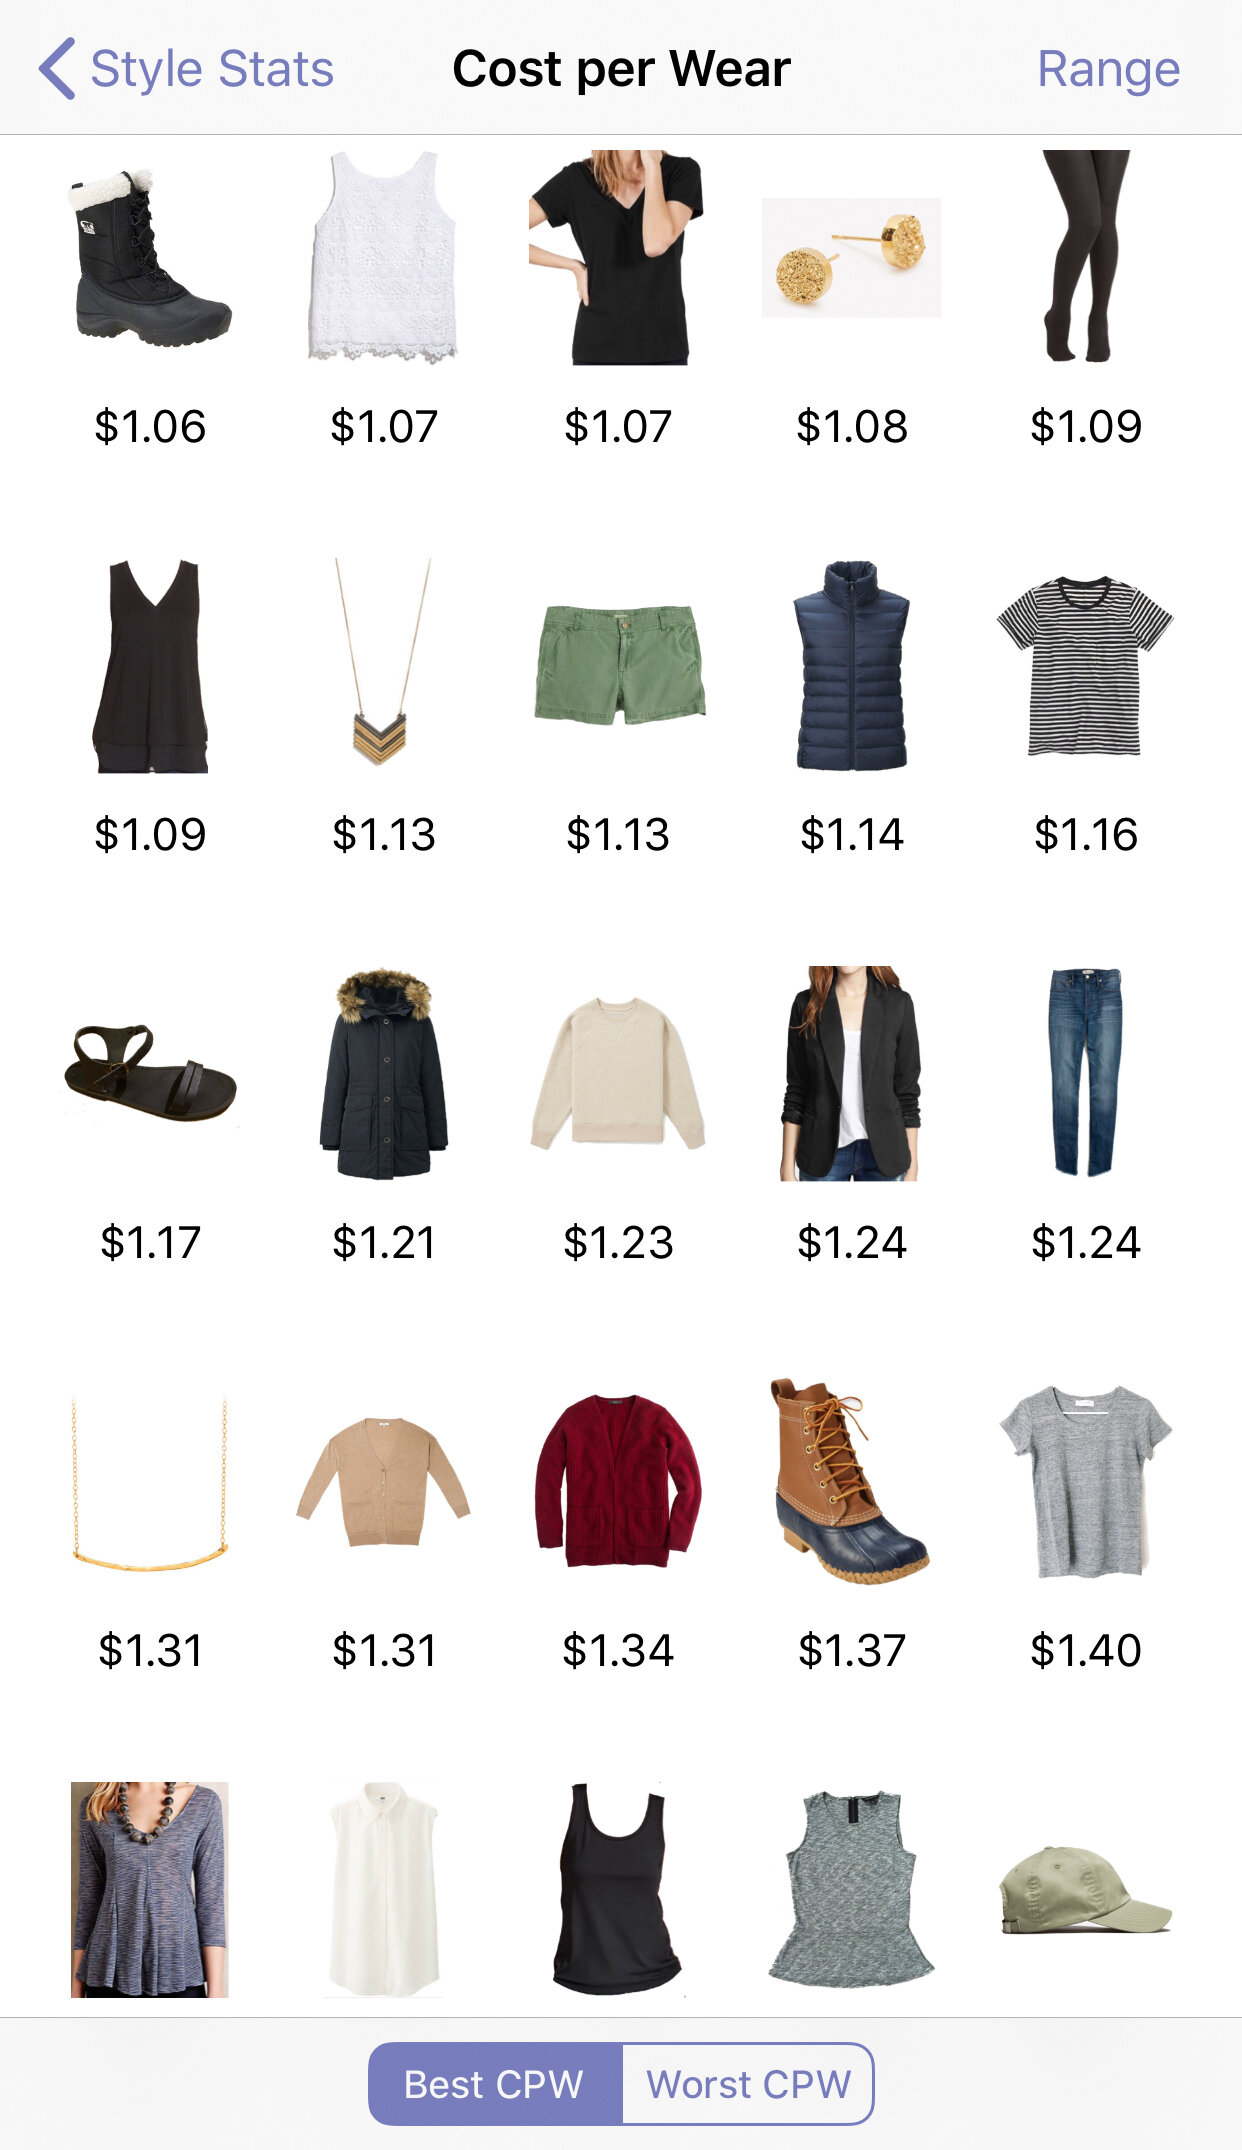
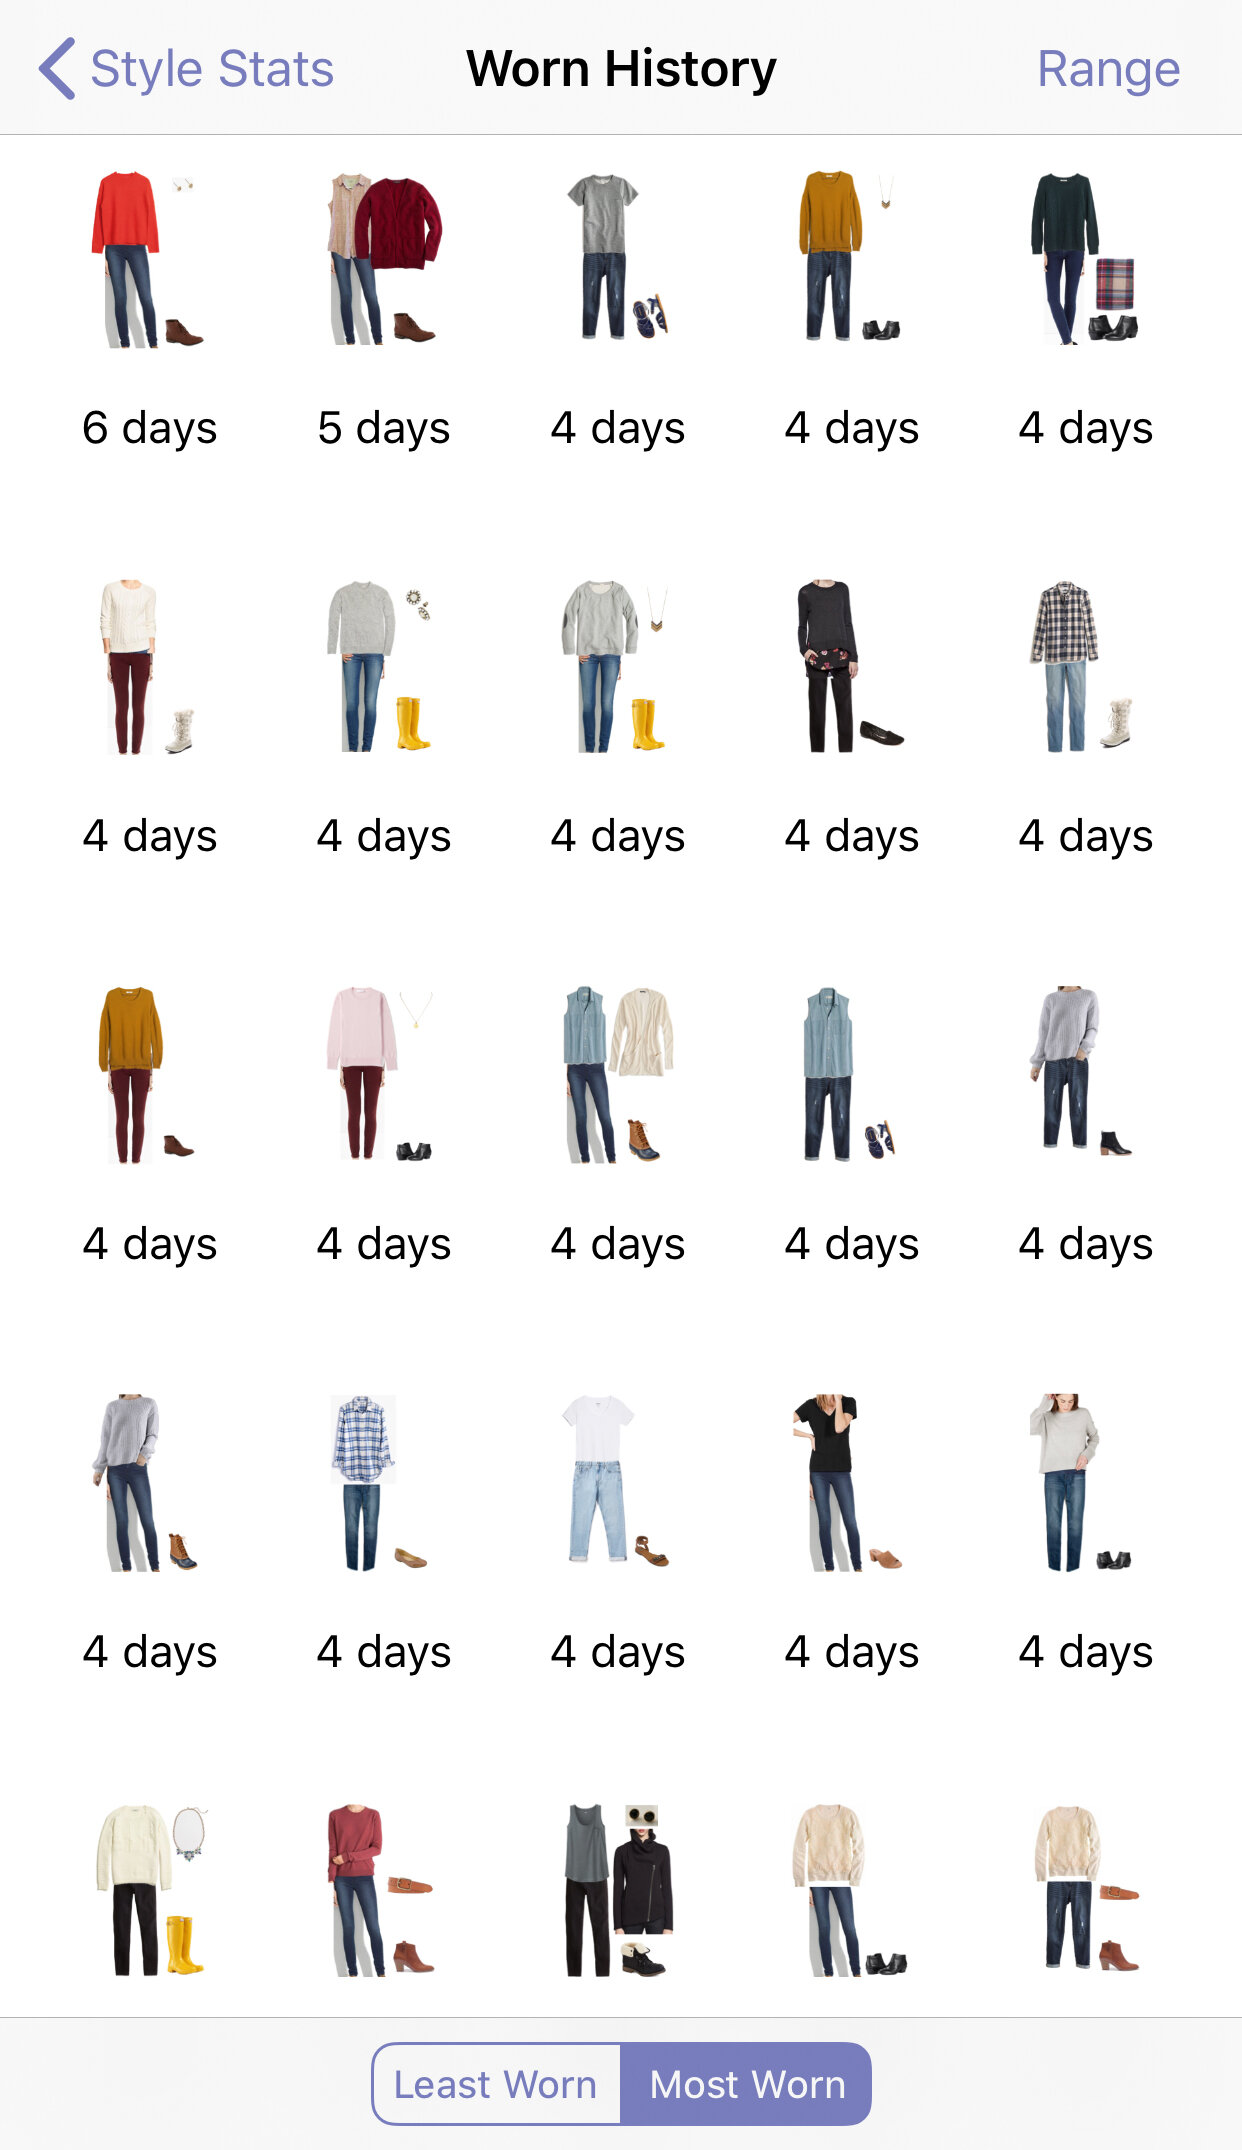
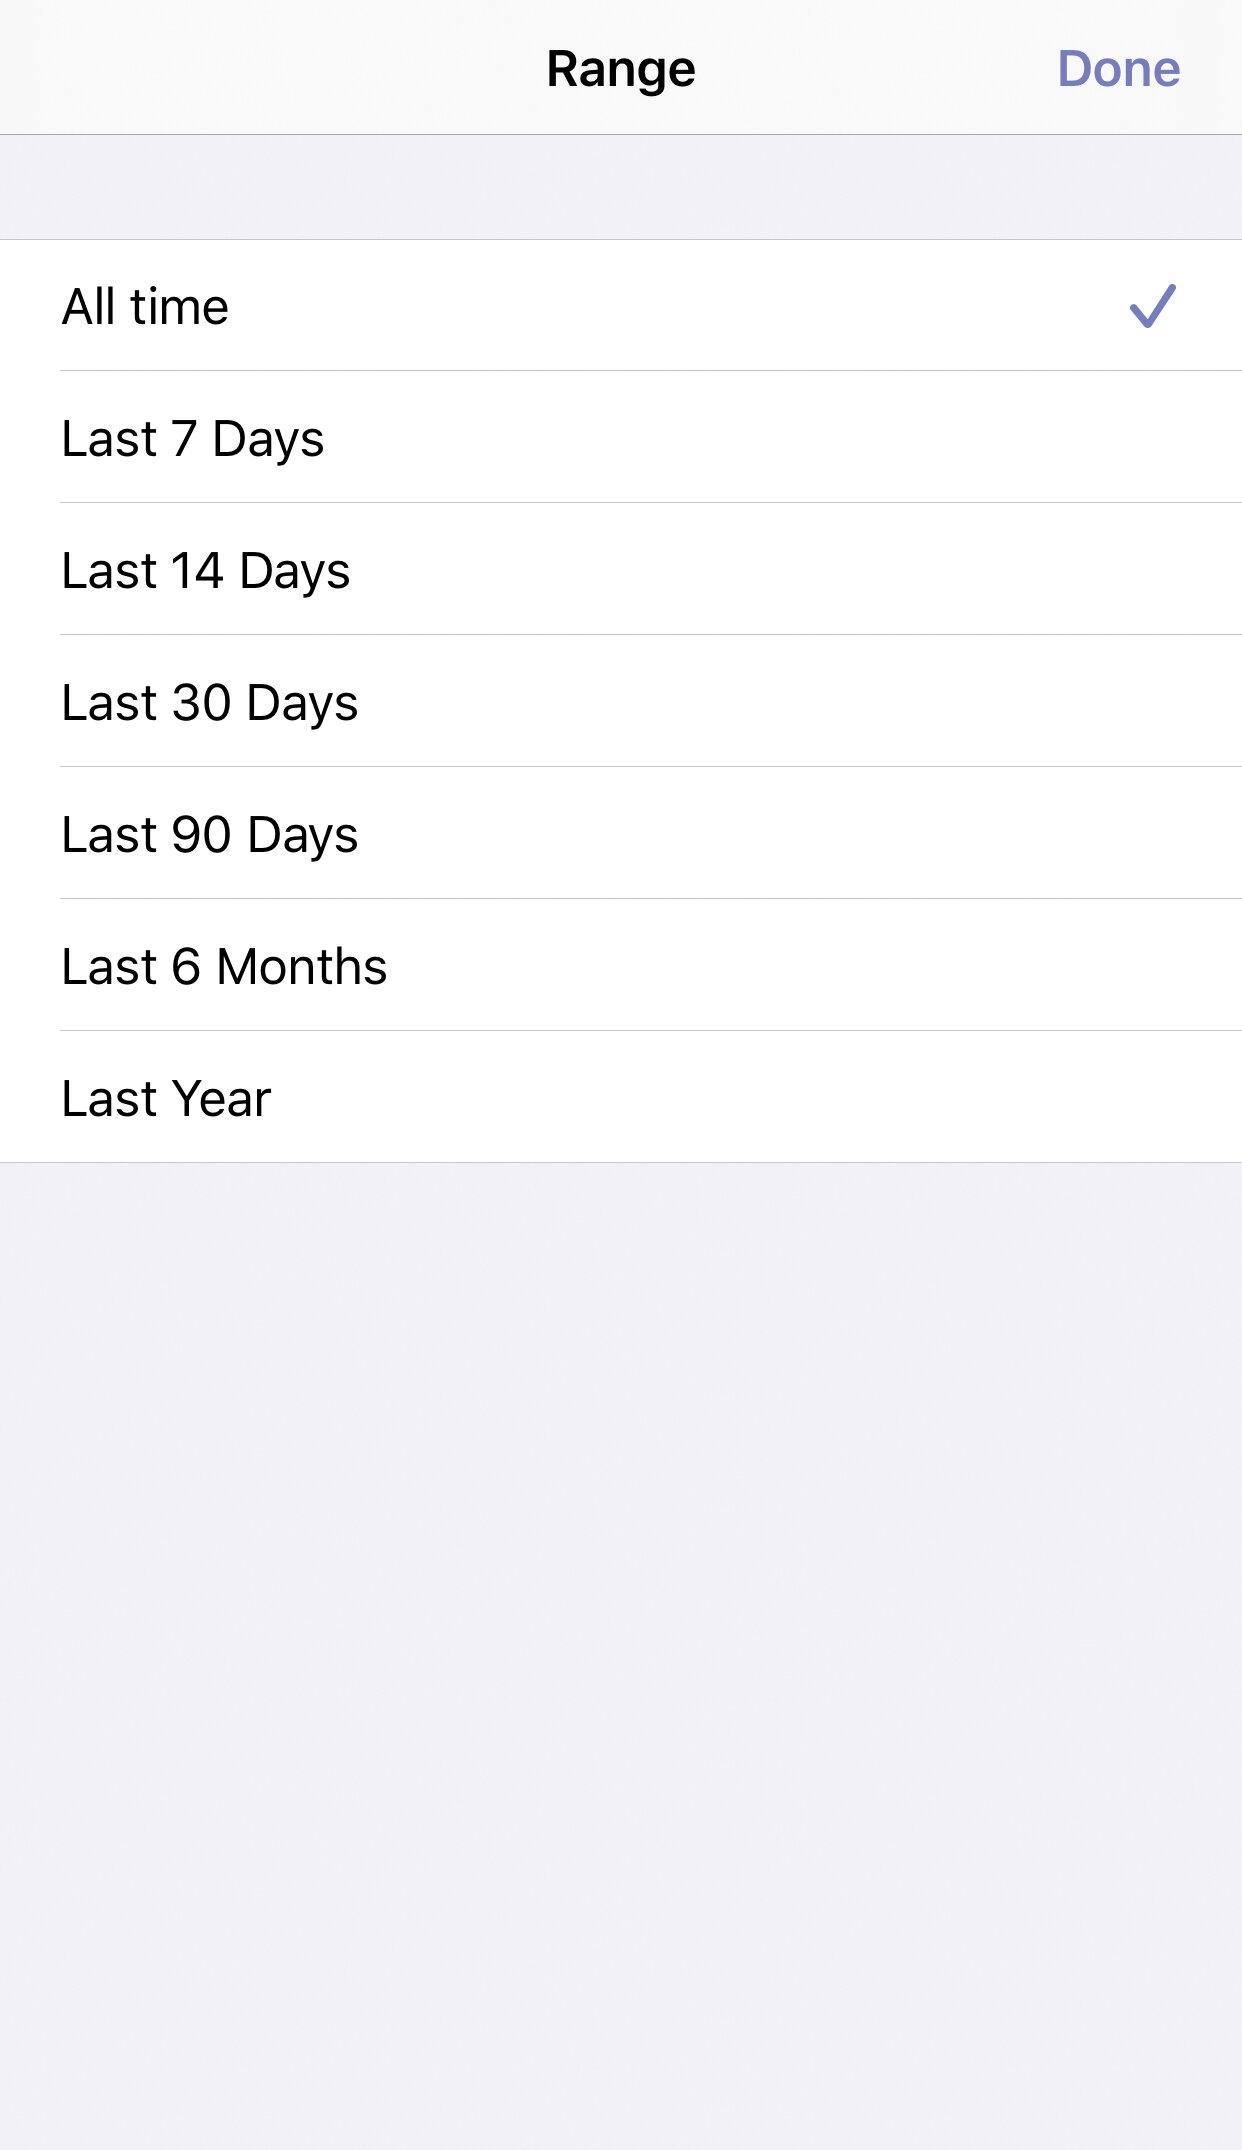
I filter the “items not logged on the calendar” stat over the past year to figure out what may need to be listed on Poshmark. I also use that stat to figure out what I need to be wearing! For the cost per wear stat, I remove the price of items that reach $1 cost per wear (and make a note of the price in the notes section) because that’s my goal cost per wear for every item in my closet. It helps me focus on wearing the items that are close to that $1 mark!
For more on my closet’s style stats, check out my closet inventories from 2022, 2020, 2019, 2018, 2017, 2016, 2015, and 2014.
How to “Remove” Items from Stylebook
Unfortunately, you can’t remove an item if it’s included in an outfit. I personally don’t delete items from outfits; I like keeping them as a record of what I wore. The downside is that there is currently no way to remove an item from the style stats without deleting it, so keeping items that I no longer own clogs up the stats and annoys me (it’s especially annoying when it comes to tracking cost per wear). Luckily, I found a way to remove an old item from most of the stats without deleting it.
When it comes time to sell or donate an item that I’ve worn in outfits, I edit the item details and move the item to a new category called “No Longer Owned” (which has subcategories called “For Sale”, “Sold”, and “Donated”). In the “Notes and Tags” section, I write down why I’m selling or donating it, what platform I’m selling it on if applicable, the original price, and the final cost per wear. Then, I remove any of the information I had saved in the individual sections and change the status to “To Donate”. Once an item sells, I remove the brand from its section and add the brand as another line in the notes section. Removing all the information from their respective sections also removes the item from those specific stats (except the most worn/least worn stats).
I move all my looks with at least one item that I no longer own to a separate category called “Retired”. Doing this decreases the visual clutter in my regular Looks categories and makes it much easier for me to go through and pick outfits to wear because I’m only looking through the outfits made up of items that I still own.
Closet App Comparison: Stylebook vs. CLADWELL
You may have heard of Cladwell, which is a closet organization app similar to Stylebook. Instead of importing your exact items like you would in Stylebook, you select the exact items you own (or similar items) from their internal catalog. And instead of creating outfits yourself like in Stylebook, Cladwell offers outfit suggestions for you based on your activities and the weather.
The app offers a 7-day free trial, and then it costs $60 per year (or ~$50 if paid in full for the year). I downloaded Cladwell when they were running some type of promo, but I did not use it for long because I prefer Stylebook. I didn’t feel the need to create my entire closet over again, so I don’t know what the app offers beyond that. Even though it would be nice to receive outfit suggestions sometimes, I don’t think it’s worth it for me to pay $60 per year to receive suggestions when I already read blogs and browse Pinterest for inspiration.
That said, I know a lot of people use and love Cladwell! I think it mostly just depends on which app you try first since it’s so much effort to get your closet into two apps. Unfortunately, like Stylebook, this app is also only available on the iOS platform.
Whew, that was a lot! I hope that was helpful, and please let me know if you have any other questions about Stylebook or how I use it! ☺️
This post was last updated in January 2022.